-
本文提出一种基于双圆光栅径向剪切干涉仪的三维位移测量方法, 其测量原理是径向剪切干涉仪所形成的莫尔条纹不仅由二维平面内位移决定, 轴向位移会在+1和–1级莫尔条纹之间产生一个特定的相移. 首先, 基于标量衍射理论对双圆光栅径向剪切干涉仪的+1和–1级莫尔条纹强度分布进行推导, 建立了三维位移量与莫尔条纹强度分布的精确解析关系; 其次, 在频谱分析的基础上, 利用半圆环滤波器进行空间滤波, 实现+1和–1级莫尔条纹的同时成像; 然后, 提出了从莫尔条纹图中定量提取三维位移的算法, 并通过数值模拟进行验证; 最后, 实验结果验证了该方法测量平面内位移的最大绝对误差为4.8 × 10⁻³ mm, 平均误差为2.0 × 10⁻⁴ mm, 轴向位移的最大绝对误差为0.25 mm, 平均误差为8.6 × 10⁻³ mm. 该方法具有装置简单、测量精度高、非接触、瞬时测量等特点, 可实现三维位移的同时测量.
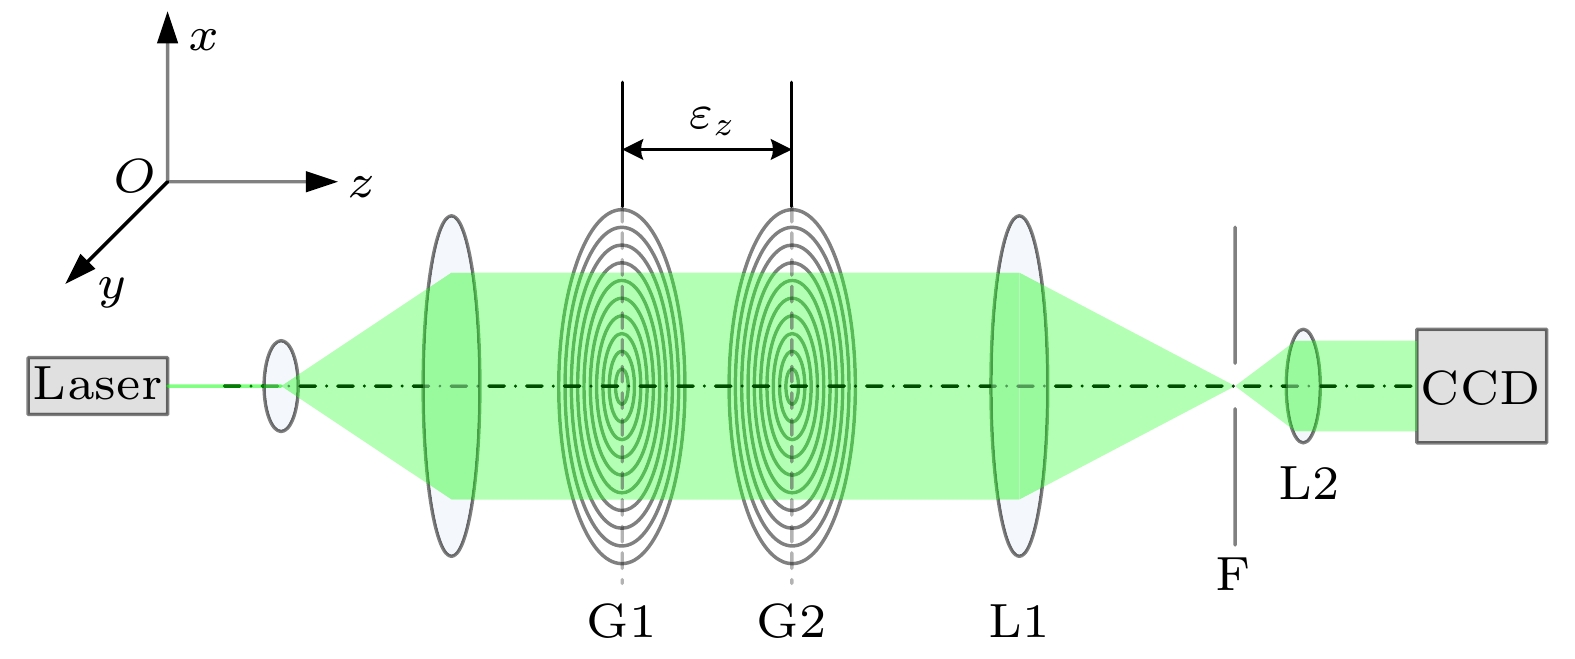
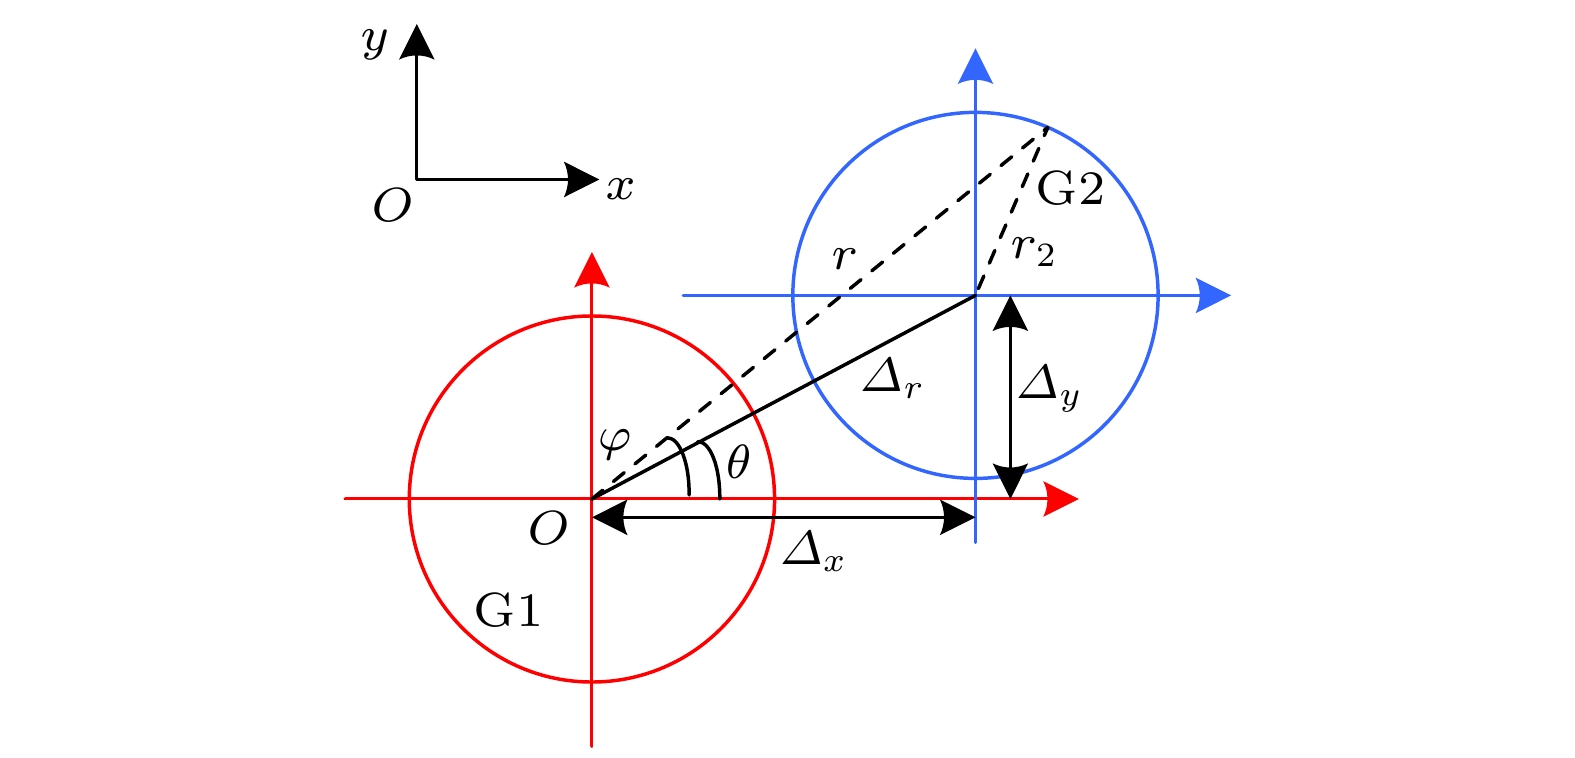
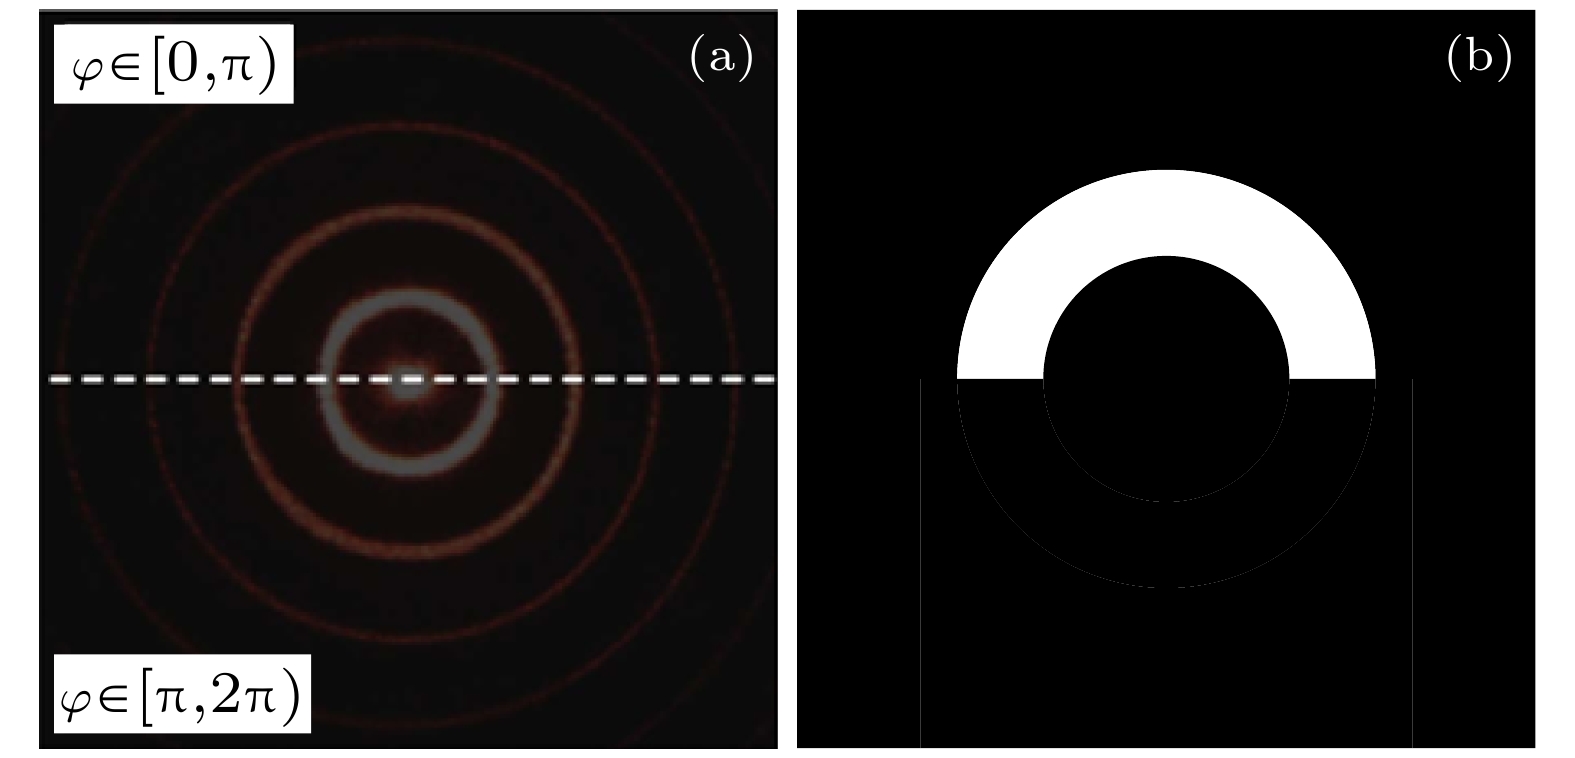
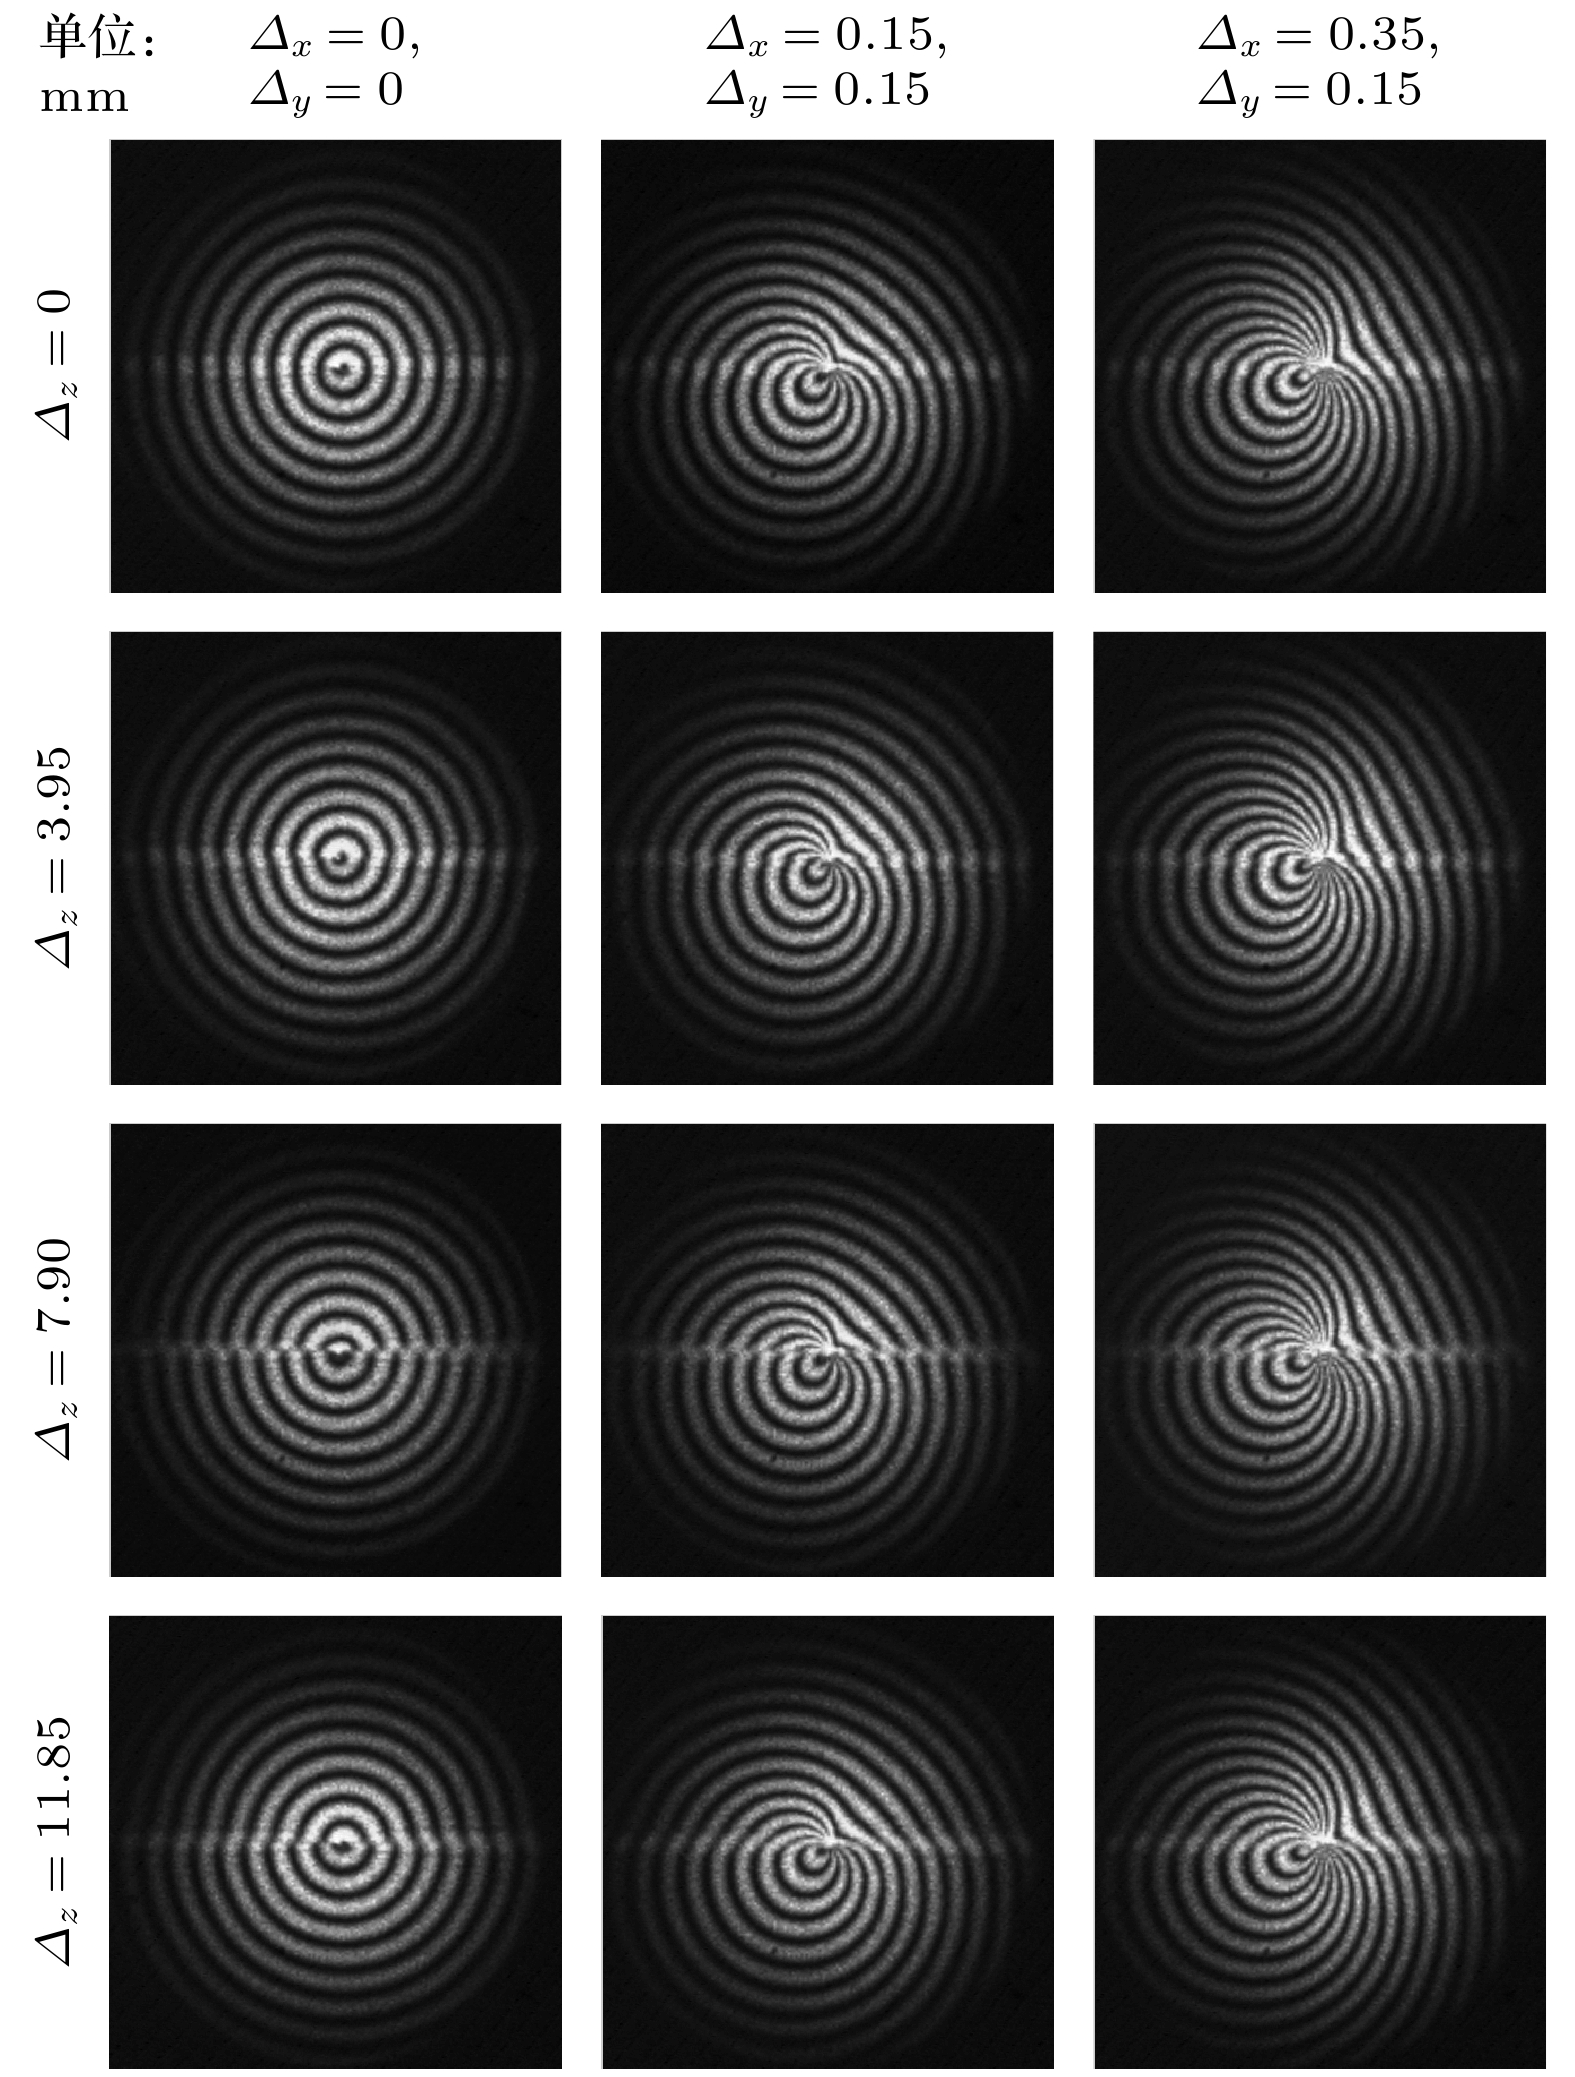
Moiré patterns formed by overlapping two circular gratings of slightly different pitches have been extensively used for measuring the two-dimensional (2D) and three-dimensional (3D) displacements. However, in the existing applications, Moiré patterns are analyzed based on geometric superposition, by which the 3D displacements cannot be instantaneously or simultaneously measured with a high accuracy. In this paper, radial shearing interferometry with double circular gratings of slightly different pitches is presented to realize the simultaneous measurement of 3D displacements. The measurement is based on the principle that Moiré patterns produced by radial shearing interferometry are determined not only by the 2D in-plane displacements, but also by the out-of-plane displacement that brings about a phase shift between Moiré patterns of +1 and –1 diffraction orders. First, the production mechanism of Moiré patterns by radial shearing interferometry is studied based on the scalar diffraction theory and the intensity distribution of Moiré fringes of +1 and –1 orders is derived to establish the exact analytic relations between Moiré patterns and 3D displacements. Second, on the basis of spectrum characteristics of circular grating, a semicircular ring filter is proposed for spatial filtering to realize the simultaneous imaging of Moiré fringes of +1 and –1 orders. Then, the algorithm to quantitatively extract 3D displacements from Moiré patterns is proposed and demonstrated by numerical simulation. In the algorithm, Moiré patterns in the rectangular coordinate system are transformed into the polar coordinate system and skeletons are extracted to determine the feature points of the bright fringes. The in-plane displacements can be solved by feature points of +1 or –1 diffraction order, and the out-of-plane displacement can be computed by the feature points of +1 and –1 diffraction orders in the same bright fringe. Finally, experimental results prove that the maximum absolute error and mean error for in-plane displacements are 4.8 × 10⁻³ mm and 2.0 × 10⁻⁴ mm respectively, and 0.25 mm and 8.6 × 10⁻³ mm for out-of-plane displacement. In conclusion, by using the Moiré patterns of +1 and –1 diffraction orders imaged by radial shearing interferometer with double circular gratings of slightly different pitches, the 3D displacement can be simultaneously measured. The method has the advantages of simple device, high measurement accuracy, non-contact and instantaneous measurement, which provides an important guidance for practically measuring the 3D displacements. -
Keywords:
- 3 D displacements measurement /
- radial shearing interferometer /
- Moiré fringes /
- circular gratings
[1] Buytaert J A N, Dirckx J J J 2007 J. Opt. Soc. Am. A 24 2003
 Google Scholar
[2] Gómez-Pedrero J A, Quiroga J A, Terrón-López M J, Crespo D 2006 Opt. Lasers Eng. 44 1297
 Google Scholar
[3] Xiao X, Kang Y, Hou Z, Qiu W, Li X, Li X 2010 Exp. Mech. 67 239
 Google Scholar
[4] Morimoto Y, Fujigaki M, Masaya A, Shimo K, Hanada R, Seto H 2011 SAE Int. J. Mater. Manuf. 4 1107
 Google Scholar
[5] Ri S, Fujigaki M, Morimoto Y 2010 Exp. Mech. 50 501
 Google Scholar
[6] Wang J, Song Y, Li Z H, He A Z 2013 Opt. Lett. 38 1116
 Google Scholar
[7] Song Y, Wang J, Jin Y, Guo Z Y, Ji Y J, He A Z, Li Z H 2016 J. Opt. Soc. Am. A 33 2385
 Google Scholar
[8] 王琛, 顾援王琛, 顾援, 傅思祖, 周关林, 吴江, 王伟, 孙玉琴, 董佳钦, 孙今人, 王瑞荣, 倪元龙, 万炳根, 黄关龙, 张国平, 林尊琪, 王世绩 2002 物理学报 51 847
 Google Scholar
Wang C, Gu Y, Fu S Z, Zhou G L, Wu J, Wang W, Sun YQ, Dong JQ, Sun JR, Wang RR, Ni YL, Wan BG, Huang GL, Zhang GP, Lin ZQ, Wang SJ 2002 Acta Phys. Sin. 51 847
 Google Scholar
[9] Dhanotia J, Prakash S, Rana S, Sasaki O 2011 Appl. Opt. 50 2958
 Google Scholar
[10] Spagnolo G S, Ambrosini D, Paoletti D 2002 J. Opt. A-Pure Appl. Opt. 3 S376
 Google Scholar
[11] Kulkarni R, Gorthi S S, Rastogi P 2014 J. Mod. Optic 61 755
 Google Scholar
[12] 于雪, 刘庆纲, 刘超, 解娴, 郎垚璞 2017 纳米技术与精密工程 15 217
 Google Scholar
Yu X, Liu Q G, Liu C, Xie X, Lang Y P 2017 Nanotech. Precis. Eng. 15 217
 Google Scholar
[13] Agarwal S, Shakher C 2015 Opt. Lasers Eng. 75 63
 Google Scholar
[14] Song J S, Lee Y H, Jo J H, Chang S, Yuk K C 1998 Opt. Commun. 154 100
 Google Scholar
[15] Park Y C, Kim S W 1994 Appl. Opt. 33 5171
 Google Scholar
[16] 朱海军, 苏显渝 2008 四川大学学报(自然科学版) 45 301
 Google Scholar
Zhu H J, Su X Y 2008 Journal of Sichuan University (Natural Science Edition) 45 301
 Google Scholar
[17] Yen K S, Ratnam M M 2012 Opt. Lasers Eng. 50 687
 Google Scholar
[18] Yen K S, Ratnam M 2011 Sensor Rev. 31 358
 Google Scholar
[19] Lay Y L, Chen W Y 1988 Opt. Laser Technol. 30 539
 Google Scholar
[20] Yen K S, Ratnam M M 2012 Opt. Lasers Eng. 50 887
 Google Scholar
[21] Wang J, Song Y, Li Z H, Sun N, He A Z 2012 J. Opt. Soc. Am. A 29 1686
 Google Scholar
[22] 苏显渝, 李继陶 1999 信息光学 (第1版) (科学出版社) 第38页
Su X Y, Li J T 1999 Information Optics (1st Ed.) (Beijing: Science Press) p38 (in Chinese)
-
表 1 实验测量结果及误差
Table 1. Measurement results and errors of experiment
Input/mm Measured/mm Absolute error/mm Δx Δy Δz Δx Δy Δz Δx Δy Δz 0.00 0.15 7.90 –0.0030 0.1458 7.6978 0.0030 0.0042 0.2022 0.05 0.15 7.90 0.0488 0.1519 7.9868 0.0012 –0.0019 –0.0868 0.10 0.15 7.90 0.0980 0.1487 7.8158 0.0020 0.0013 0.0842 0.15 0.15 7.90 0.1512 0.1548 8.1415 –0.0012 –0.0048 –0.2415 0.20 0.15 7.90 0.2002 0.1458 7.6720 –0.0002 0.0042 0.2280 0.25 0.15 7.90 0.2496 0.1494 7.8628 0.0004 0.0006 0.0372 0.30 0.15 7.90 0.3014 0.1482 7.8078 –0.0014 0.0018 0.0922 0.35 0.15 7.90 0.3516 0.1544 8.1468 –0.0016 –0.0044 –0.2468 Mean error 0.0003 0.0001 0.0086 -
[1] Buytaert J A N, Dirckx J J J 2007 J. Opt. Soc. Am. A 24 2003
 Google Scholar
[2] Gómez-Pedrero J A, Quiroga J A, Terrón-López M J, Crespo D 2006 Opt. Lasers Eng. 44 1297
 Google Scholar
[3] Xiao X, Kang Y, Hou Z, Qiu W, Li X, Li X 2010 Exp. Mech. 67 239
 Google Scholar
[4] Morimoto Y, Fujigaki M, Masaya A, Shimo K, Hanada R, Seto H 2011 SAE Int. J. Mater. Manuf. 4 1107
 Google Scholar
[5] Ri S, Fujigaki M, Morimoto Y 2010 Exp. Mech. 50 501
 Google Scholar
[6] Wang J, Song Y, Li Z H, He A Z 2013 Opt. Lett. 38 1116
 Google Scholar
[7] Song Y, Wang J, Jin Y, Guo Z Y, Ji Y J, He A Z, Li Z H 2016 J. Opt. Soc. Am. A 33 2385
 Google Scholar
[8] 王琛, 顾援王琛, 顾援, 傅思祖, 周关林, 吴江, 王伟, 孙玉琴, 董佳钦, 孙今人, 王瑞荣, 倪元龙, 万炳根, 黄关龙, 张国平, 林尊琪, 王世绩 2002 物理学报 51 847
 Google Scholar
Wang C, Gu Y, Fu S Z, Zhou G L, Wu J, Wang W, Sun YQ, Dong JQ, Sun JR, Wang RR, Ni YL, Wan BG, Huang GL, Zhang GP, Lin ZQ, Wang SJ 2002 Acta Phys. Sin. 51 847
 Google Scholar
[9] Dhanotia J, Prakash S, Rana S, Sasaki O 2011 Appl. Opt. 50 2958
 Google Scholar
[10] Spagnolo G S, Ambrosini D, Paoletti D 2002 J. Opt. A-Pure Appl. Opt. 3 S376
 Google Scholar
[11] Kulkarni R, Gorthi S S, Rastogi P 2014 J. Mod. Optic 61 755
 Google Scholar
[12] 于雪, 刘庆纲, 刘超, 解娴, 郎垚璞 2017 纳米技术与精密工程 15 217
 Google Scholar
Yu X, Liu Q G, Liu C, Xie X, Lang Y P 2017 Nanotech. Precis. Eng. 15 217
 Google Scholar
[13] Agarwal S, Shakher C 2015 Opt. Lasers Eng. 75 63
 Google Scholar
[14] Song J S, Lee Y H, Jo J H, Chang S, Yuk K C 1998 Opt. Commun. 154 100
 Google Scholar
[15] Park Y C, Kim S W 1994 Appl. Opt. 33 5171
 Google Scholar
[16] 朱海军, 苏显渝 2008 四川大学学报(自然科学版) 45 301
 Google Scholar
Zhu H J, Su X Y 2008 Journal of Sichuan University (Natural Science Edition) 45 301
 Google Scholar
[17] Yen K S, Ratnam M M 2012 Opt. Lasers Eng. 50 687
 Google Scholar
[18] Yen K S, Ratnam M 2011 Sensor Rev. 31 358
 Google Scholar
[19] Lay Y L, Chen W Y 1988 Opt. Laser Technol. 30 539
 Google Scholar
[20] Yen K S, Ratnam M M 2012 Opt. Lasers Eng. 50 887
 Google Scholar
[21] Wang J, Song Y, Li Z H, Sun N, He A Z 2012 J. Opt. Soc. Am. A 29 1686
 Google Scholar
[22] 苏显渝, 李继陶 1999 信息光学 (第1版) (科学出版社) 第38页
Su X Y, Li J T 1999 Information Optics (1st Ed.) (Beijing: Science Press) p38 (in Chinese)
计量
- 文章访问数: 8293
- PDF下载量: 125
- 被引次数: 0


 下载:
下载:


