-
非球面光学元件在芯片制造、遥感探测及航空航天等前沿领域具有重要应用价值, 因而对其加工和检测精度的要求不断提高. 非球面环形子孔径拼接测量技术是一种高精度、通用性强的有效检测技术, 但在大非球面度、大陡度元件检测中显著的面形特征与测量误差的耦合问题制约了其测量精度的提升. 本文提出一种基于全口径面形特征与局部测量误差全局优化拟合的非球面测量误差解耦合技术, 通过构建包含全口径圆形泽尼克多项式与子孔径环形泽尼克多项式的全局优化模型, 实现全口径面形特征与子孔径局部测量误差的同步拟合解算与解耦合并提升测量精度. 仿真与实验结果表明, 该技术可有效地分离面形特征与测量误差, 同时可避免传统拼接测量方法中面形参考基准存在误差和子孔径误差累积的问题, 在本文的实验中其PVr精度较传统方法可提升近30%. 此外, 该技术无需依赖子孔径重叠区域, 能够减少子孔径数量、提升测量效率. 此方法为大非球面度、大陡度光学元件的高精度测量提供了技术解决方案.
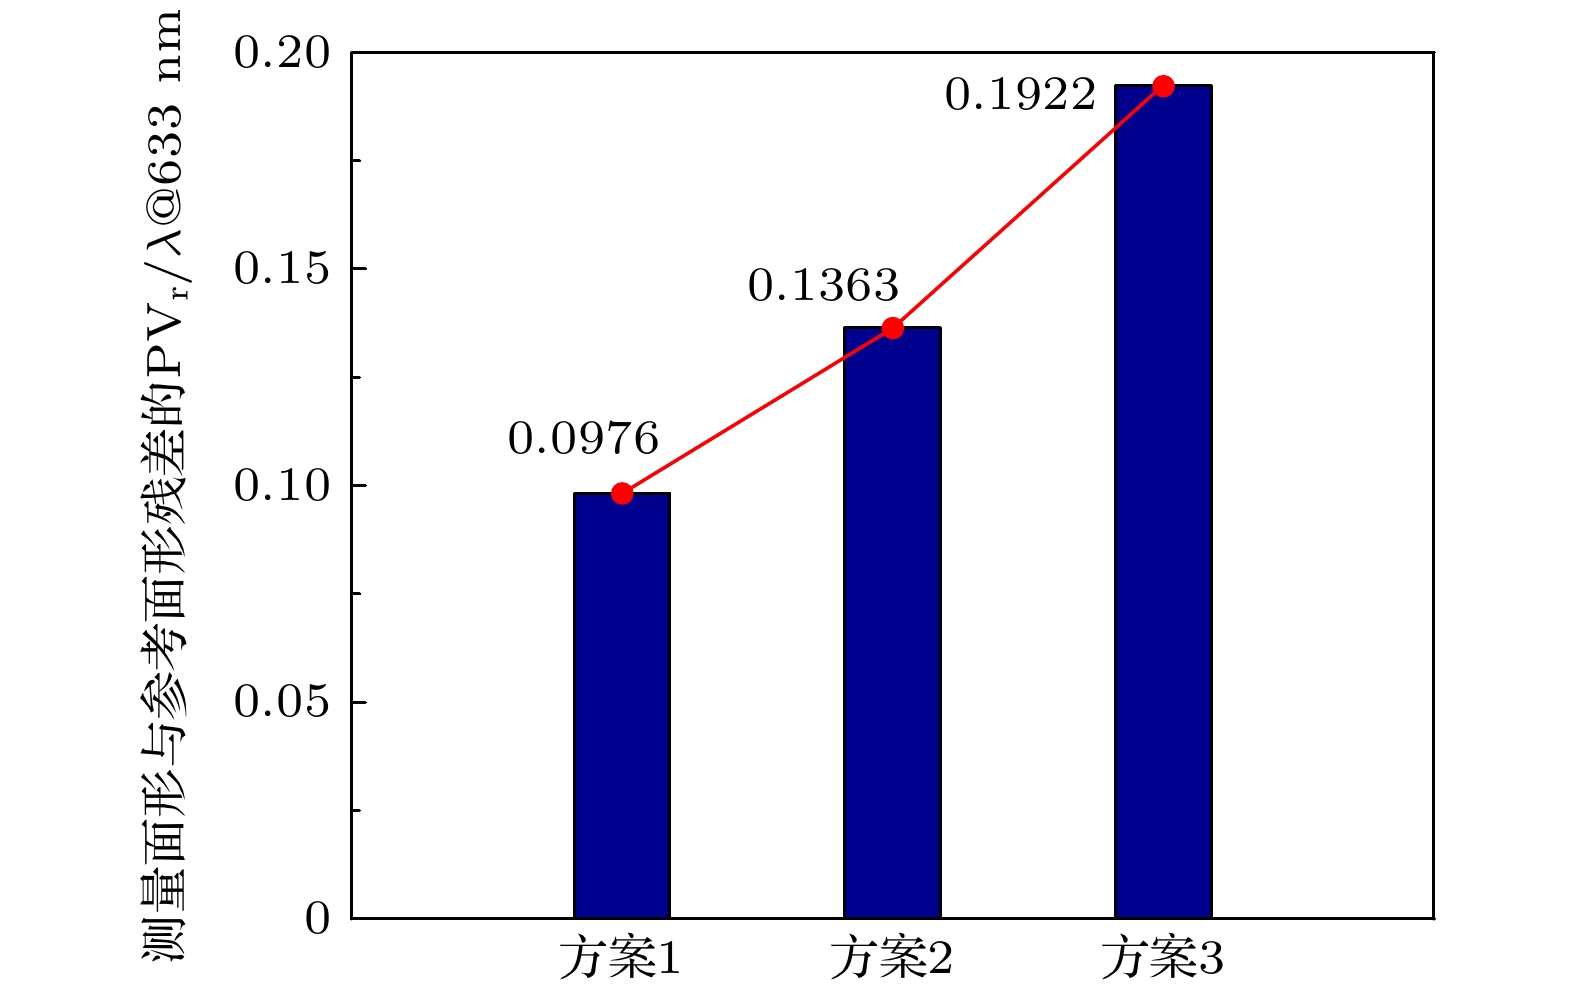
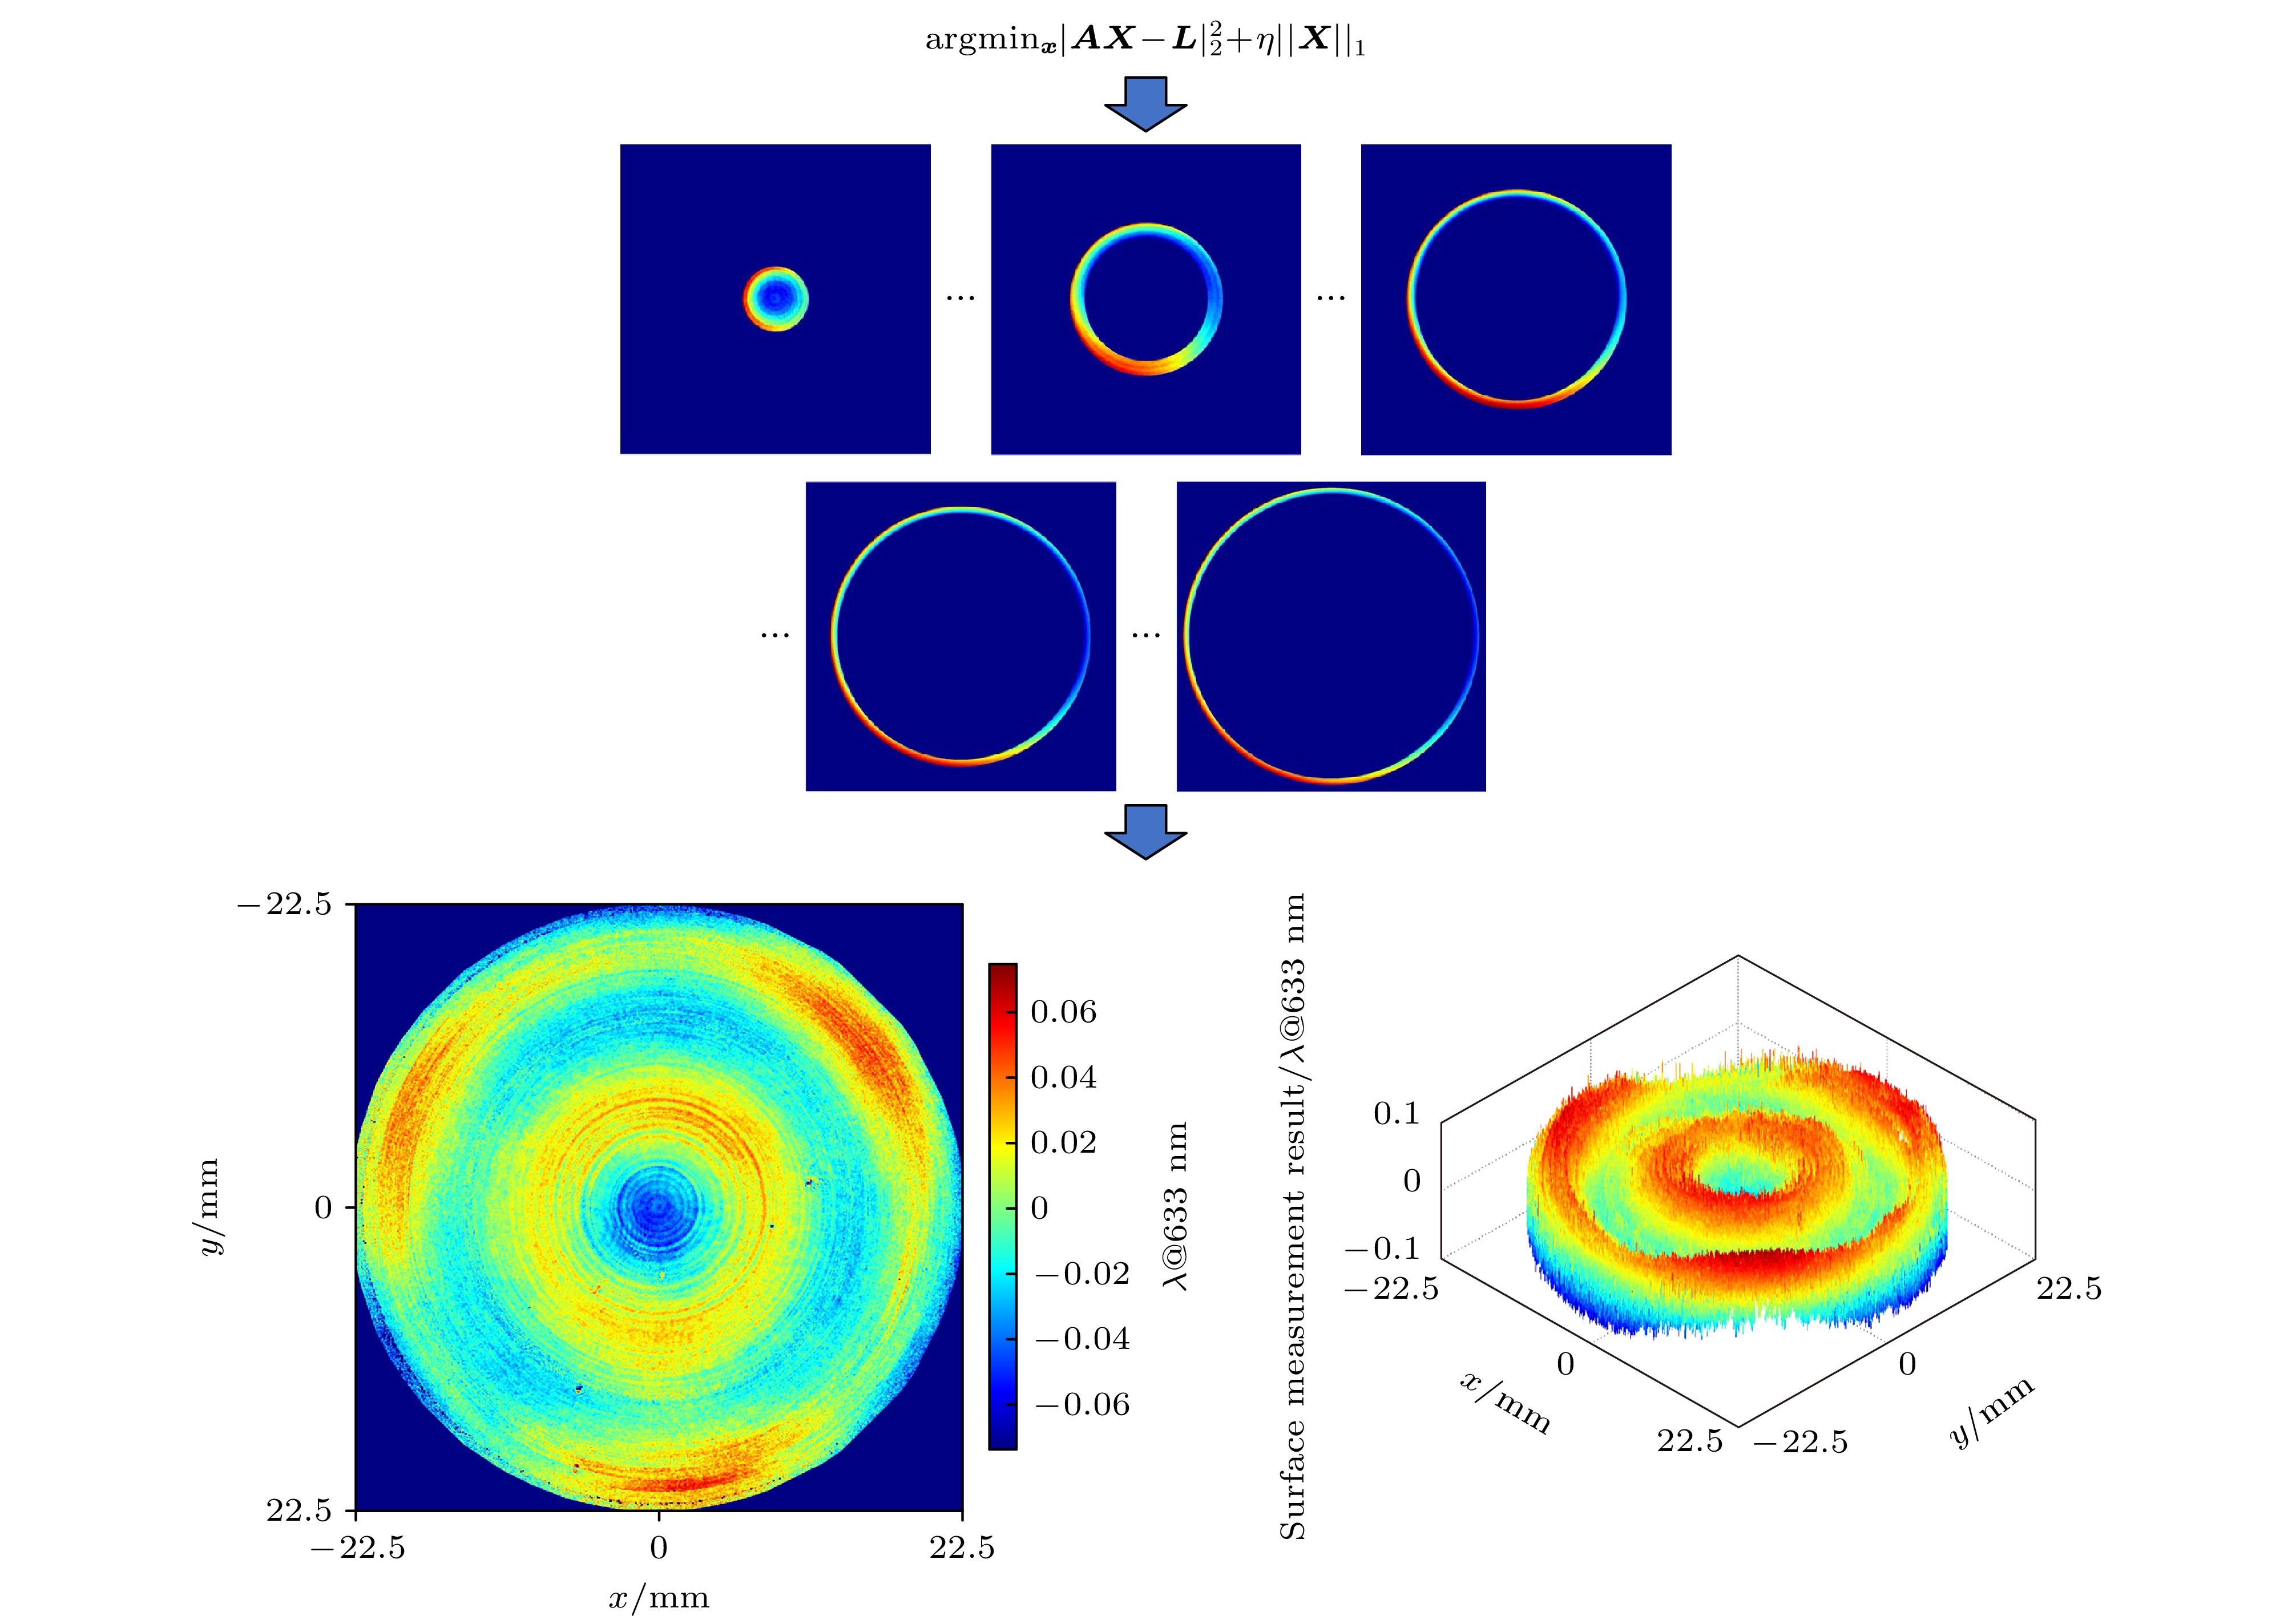
Aspheric optical elements are essential in high-end manufacturing and scientific research. As precision demands increase, the coupling of surface features and measurement errors during high-asphericity and high steepness element measurement based on annular subaperture stitching limits the development of high-precision measurement. The coupling of surface features and measurement errors refers to that for high-steepness aspheric element to be measured, the measurement errors caused by retrace errors correspond to higher-order aberration features, which are likely to be consistent with the surface features, and this coupling makes it impossible to eliminate measurement errors by subtracting Zernike terms during full-aperture surface stitching measurement, because this would lead to the incorrect subtraction of surface features. The traditional overlapping-region based subaperture stitching method encounters two major problems: the error of the first subaperture, which serves as the reference, cannot be decoupled, and the error accumulation caused by a large number of subapertures will seriously affect measurement accuracy, especially when measuring high-steepness aspheric element. To solve the error coupling problem, this work proposes an aspherical measurement error decoupling technology based on global optimal fitting of full-aperture surface shape features and local measurement errors. This method takes advantage of the continuity of the full-aperture surface shape features of the aspheric surface of all subapertures and the discontinuity of the measurement errors of each subaperture. The method uses full-aperture circular and subaperture annular Zernike polynomials to build a global optimization model, where the former represents surface features and the latter describes subaperture errors; in addition, an L1 regularization term is added. By integrating these polynomials to create a global optimization function and solving for Zernike coefficients, the full-aperture surface shape features and the measurement errors of each subaperture can be solved separately (corresponding to the coefficients of the Zernike polynomials), and error decoupling and enhanced accuracy can be achieved. Furthermore, processing errors can globally avoid error accumulation in the traditional method and reduce the number of subapertures for higher measurement efficiency. Simulation and experimental validations are demonstrated in this paper. In the simulation experiment, the full-aperture surface features of the aspheric surface to be measured and the measurement errors of each subaperture are generated separately by using Zernike polynomials and the method proposed in this paper. The results are shown below. The full-aperture surface shape features and the subaperture measurement errors are solved separately; the correct surface measurement results after measurement error decoupling are obtained; the calculated results are compared with the true values of the Zernike coefficients of the surface shape features and measurement errors used in the simulation to verify the accuracy. The simulation shows effective fitting of Zernike polynomial coefficients and error decoupling. In the experimental verification, an aspheric measurement system is built, and a high-steepness aspheric element is used as the measurement target (a convex aspheric surface, a rotationally symmetric quadratic surface with a diameter of 45 mm, a vertex curvature radius of 150 mm, a conic constant of –48, an asphericity of 63.2 μm, and a maximum asphericity gradient of 19.12 μm/mm). The method proposed in this work and the traditional methods are compared with each other, and a profilometer is used to obtain the measurement results as reference result. Experiments show that the error decoupling in measurement of high-asphericity and high steepness elements is achieved with the proposed method, and the PVr accuracy of measurement is 0.0976λ@633 nm, improved by nearly 30% compared with traditional methods. The proposed method provides a practical solution for high-precision measurement of high-asphericity and high steep components in solving the problem of measurement error coupling. Future research will further explore the application value of the proposed method in aspheric processing, especially in achieving performance optimization in various specific measurement scenarios. -
Keywords:
- optical surface measurement /
- asphere /
- subaperture stitching /
- global stitching
[1] 张磊 2016 博士学位论文(杭州: 浙江大学)
Zhang L 2016 Ph. D. Dissertation (Hangzhou: Zhejiang University
[2] Küchel M F 2009 Proc. SPIE 7389 738916
 Google Scholar
[3] 闫力松 2015 博士学位论文(长春: 中国科学院大学(中国科学院长春光学精密机械与物理研究所))
Yan L S 2015 Ph. D. Dissertation (Changchun: China University of Chinese Academy of Sciences (Changchun Institute of Optics and Fine Mechanics and Physics, Chinese Academy of Science)
[4] Kim C J 1982 Appl. Opt. 21 4521
 Google Scholar
[5] 闫力松, 王孝坤, 罗霄, 郑立功, 张学军 2013 红外与激光工程 42 1793
Yan L S, Wang X K, Luo X, Zheng L G, Zhang X J 2013 Infrared Laser Eng. 42 1793
[6] 王宁 2013 硕士学位论文(成都: 中国科学院大学(中国科学院光电技术研究所))
Wang N 2013 M. S. Thesis (Chengdu: China University of Chinese Academy of Sciences (Institute of Optics and Electronics, Chinese Academy of Sciences)
[7] Liu Y M, Lawrence G N, Koliopoulos C L 1988 Appl. Opt. 27 4504
 Google Scholar
[8] Melozzi M, Pezzati L, Mazzoni A 1993 Opt. Eng. 32 5
 Google Scholar
[9] Fleig J, Dumas P, Murphy P E, Forbes G W 2003 Advanced Characterization Techniques for Optics, Semiconductors, and Nanotechnologies San Diego, California, United States, August 3–8, 2003 p296
[10] 王孝坤, 张学军, 王丽辉, 郑立功 2006 光学精密工程 14 527
Wang X K, Zhang X J, Wang L H, Zheng L G 2006 Opt. Precis. Eng. 14 527
[11] 王孝坤, 郑立功 张学军 2010 光学学报 30 2022
 Google Scholar
Wang X K, Zheng L G, Zhang X J 2010 Acta Opt. Sin. 30 2022
 Google Scholar
[12] Chen S Y, Xue S, Wang G L, Tian Y 2017 Opt. Commun. 390 61
 Google Scholar
[13] Hou X, Wu F, Yang L, Wu S B, Chen Q 2006 Appl. Opt. 45 3442
 Google Scholar
[14] Wen Y, Cheng H 2015 Optik 126 2236
 Google Scholar
[15] 郝群, 宁妍, 胡摇 2018 计测技术 38 1
Hao Q, Ning Y, Hu Y 2018 Metrol. Meas. Tech. 38 1
[16] Hou X, Wu F, Yang L, Chen Q 2007 Opt. Express 15 12890
 Google Scholar
[17] Henselmans R 2009 Ph. D. Dissertation (Eindhoven: Technische Universiteit Eindhoven
[18] https://metrology.mahr.com/en-us/news-events/newsroom/item/testing-double-sided-optical-elements-with-the-marsurf-ld-260-aspheric-3d/ [2025-6-30]
[19] https://www.taylor-hobson.com.cn/products/non-contact-3d-optical-profilers/luphos/ [2025-6-30]
[20] https://www.optipro.com/optical-measuring/ultrasurf-5x/ [2025-6-30]
[21] 卢云君, 唐锋, 王向朝, 郭福东 2018 中国激光 45 0404002
 Google Scholar
Lu Y J, Tang F, Wang X Z, Guo F D 2018 Chin. J. Laser. 45 0404002
 Google Scholar
[22] 侯溪, 伍凡, 杨力, 吴时彬, 陈强 2005 光电工程 32 20
Hou X, Wu F, Yang L, Wu S B, Chen Q 2005 Opto-Electron. Eng. 32 20
[23] Beisswanger R, Weckerle M, Pruss C, Reichelt S 2022 Opt. Express 30 25803
 Google Scholar
[24] Gronle A, Pruss C, Herkommer A 2022 Opt. Express 30 797
 Google Scholar
[25] Niu K, Tian C 2022 J. Opt. 24 123001
 Google Scholar
[26] 翟天保 2020 硕士学位论文(上海: 东华大学)
Zhai T B 2020 M. S. Thesis (Shanghai: Donghua University
[27] Mahanjan V N 1981 J. Opt. Soc. Am. A 71 75
 Google Scholar
[28] Hou X, Wu F, Yang L, Chen Q 2006 Appl. Opt. 45 8893
 Google Scholar
[29] 樊孝贺 2019 博士学位论文(长春: 中国科学院大学(中国科学院长春光学精密机械与物理研究所))
Fan X H 2019 Ph. D. Dissertation (Changchun: China University of Chinese Academy of Sciences (Changchun Institute of Optics, Fine Mechanics and Physics, Chinese Academy of Sciences)
[30] 朱黎明 2009 硕士学位论文(哈尔滨: 哈尔滨工业大学)
Zhu L M 2009 M. S. Thesis (Harbin: Harbin Institute of Technology
[31] 乔玉晶, 谭久彬, 王伟波 2008 光电子·激光 19 1497
Qiao Y J, Tan J B, Wang W B 2008 J. Optoelectron. Laser 19 1497
[32] Xue D, Zheng L, Zhang X 2005 Optical Design and Testing II Beijing, China, November 8–11, 2004 p752
[33] Robbins H, Monro S 1951 Ann. Math. Stat. 22 400
 Google Scholar
[34] Bertsekas D P, Tsitsiklis J N 2000 SIAM J. Optim. 10 627
 Google Scholar
[35] Forbes G W 2007 Opt. Express 15 5218
 Google Scholar
[36] 王秀娟 2023 硕士学位论文(合肥: 合肥工业大学)
Wang X J 2023 M. S. Thesis (Hefei: Hefei University of Technology
[37] 何丽, 武中华, 康燕, 苏志德 2016 激光与光电子学进展 53 122201
 Google Scholar
He L, Wu Z H, Kang Y, Su Z D 2016 Laser Optoelectron. Prog. 53 122201
 Google Scholar
[38] Evans C J 2009 Opt. Eng. 48 043605
 Google Scholar
-
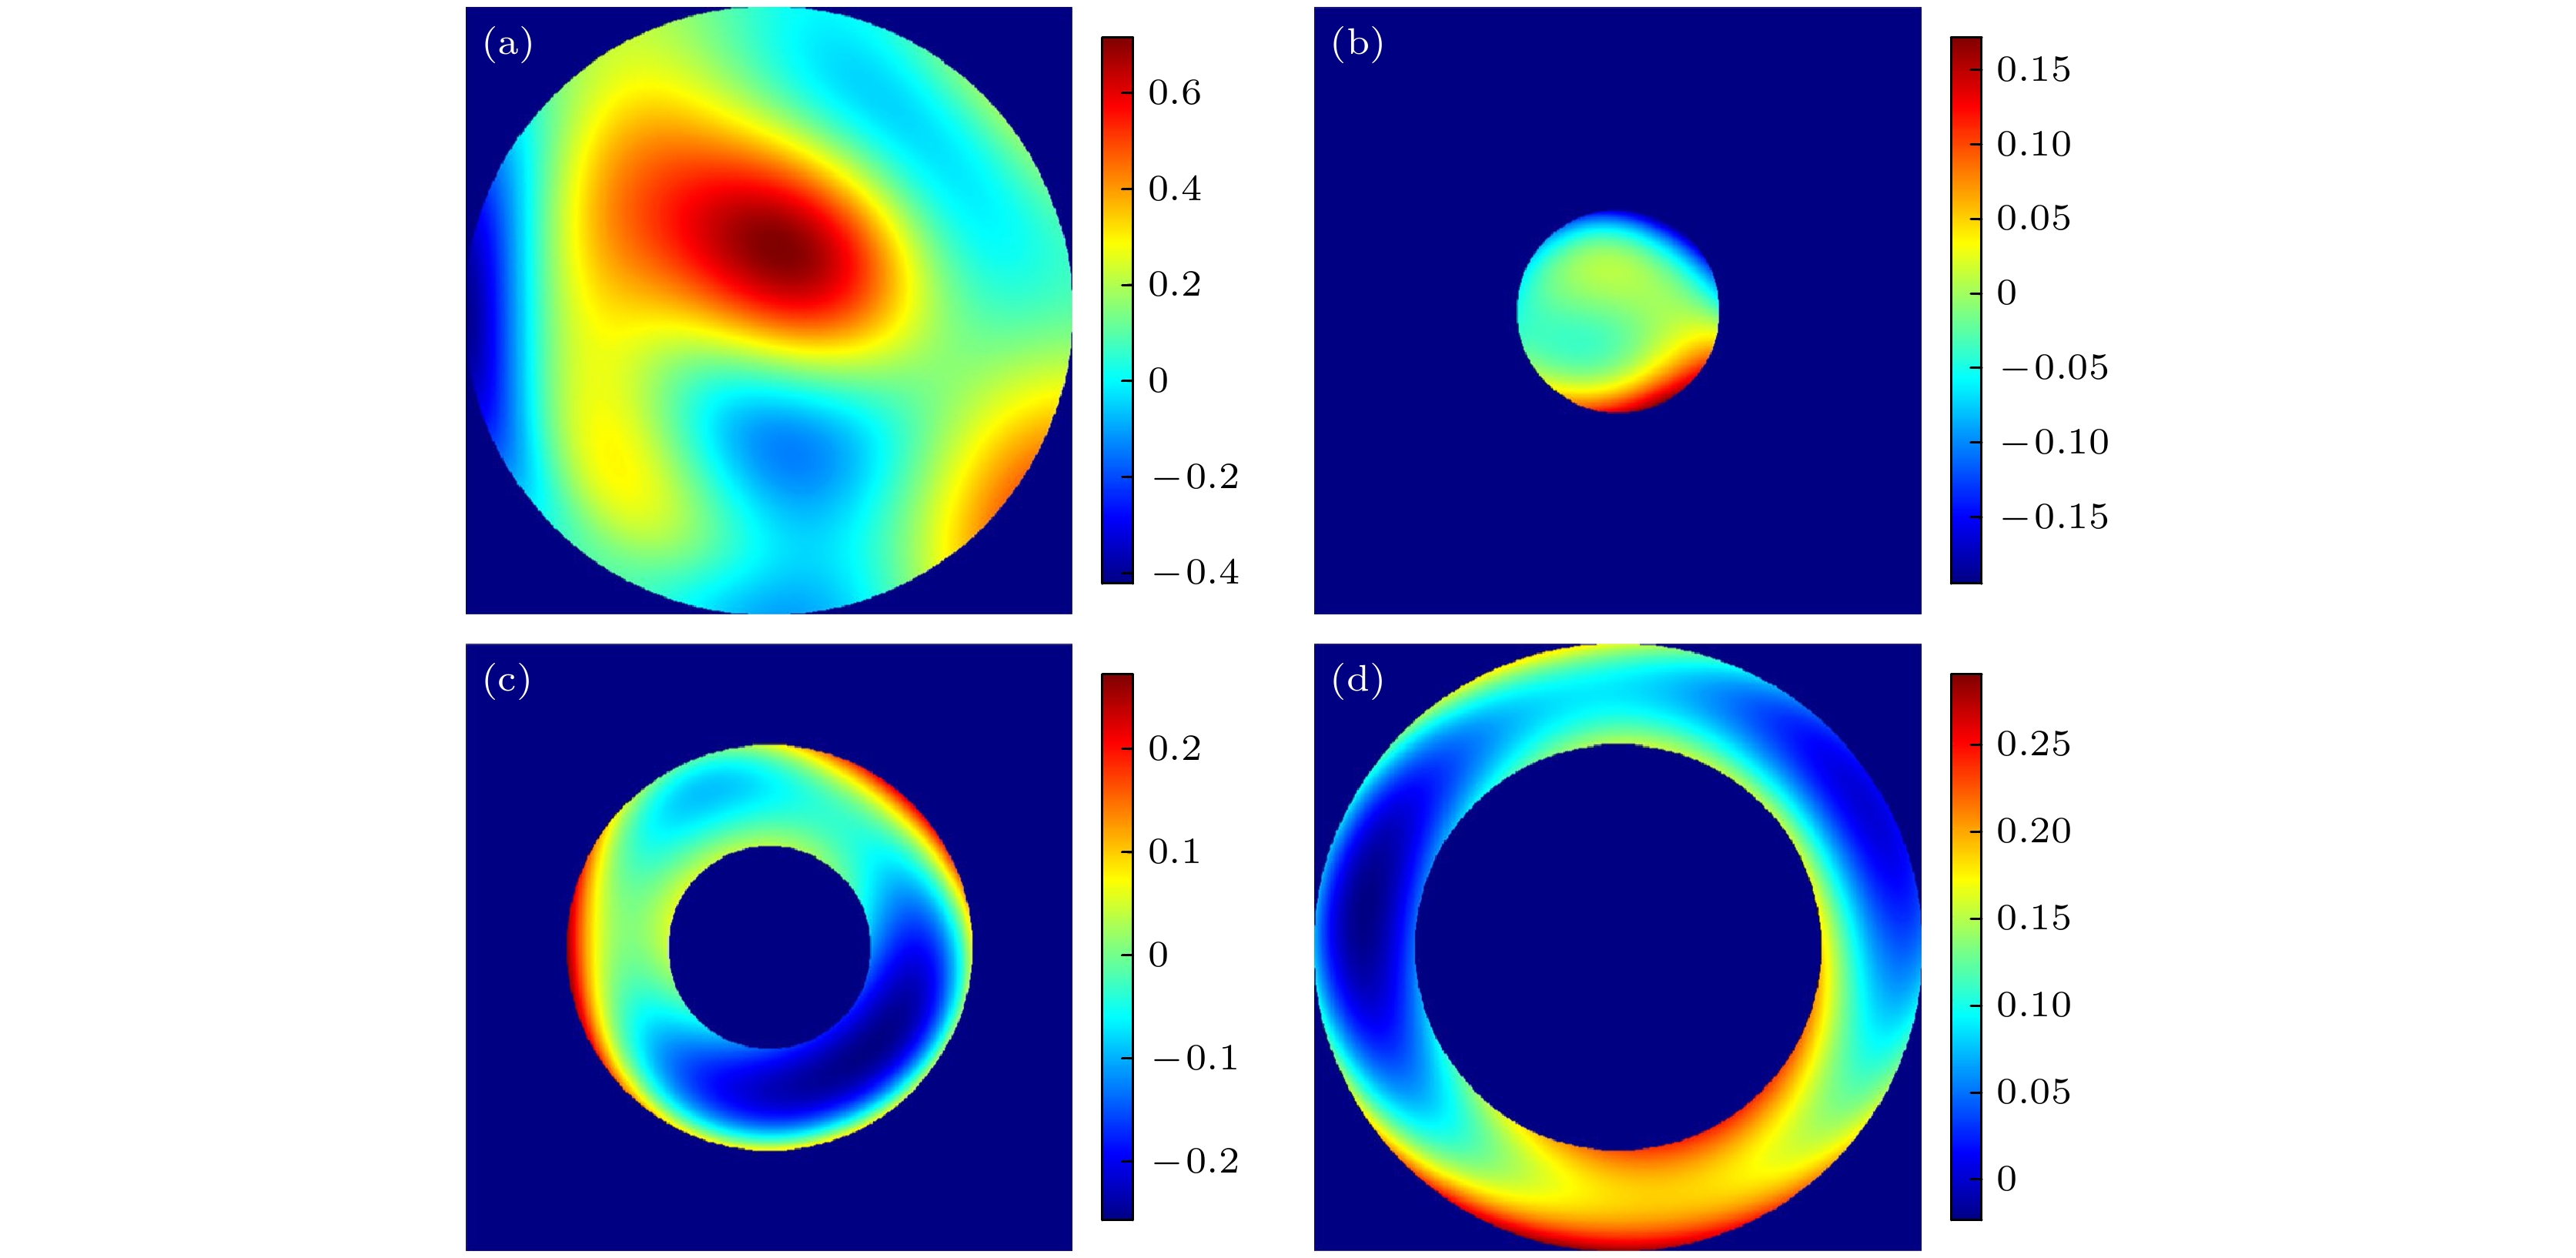
图 3 仿真生成的待测镜面形和测量误差 (a) 圆形全口径面形; (b) 第1个子孔径测量误差; (c) 第2个子孔径测量误差; (d) 第3个子孔径测量误差
Fig. 3. Simulated aspheric surface and measurement errors: (a) Full-aperture surface; (b) measurement error of the 1st subaperture; (c) measurement error of the 2nd subaperture; (d) measurement error of the 3rd subaperture.
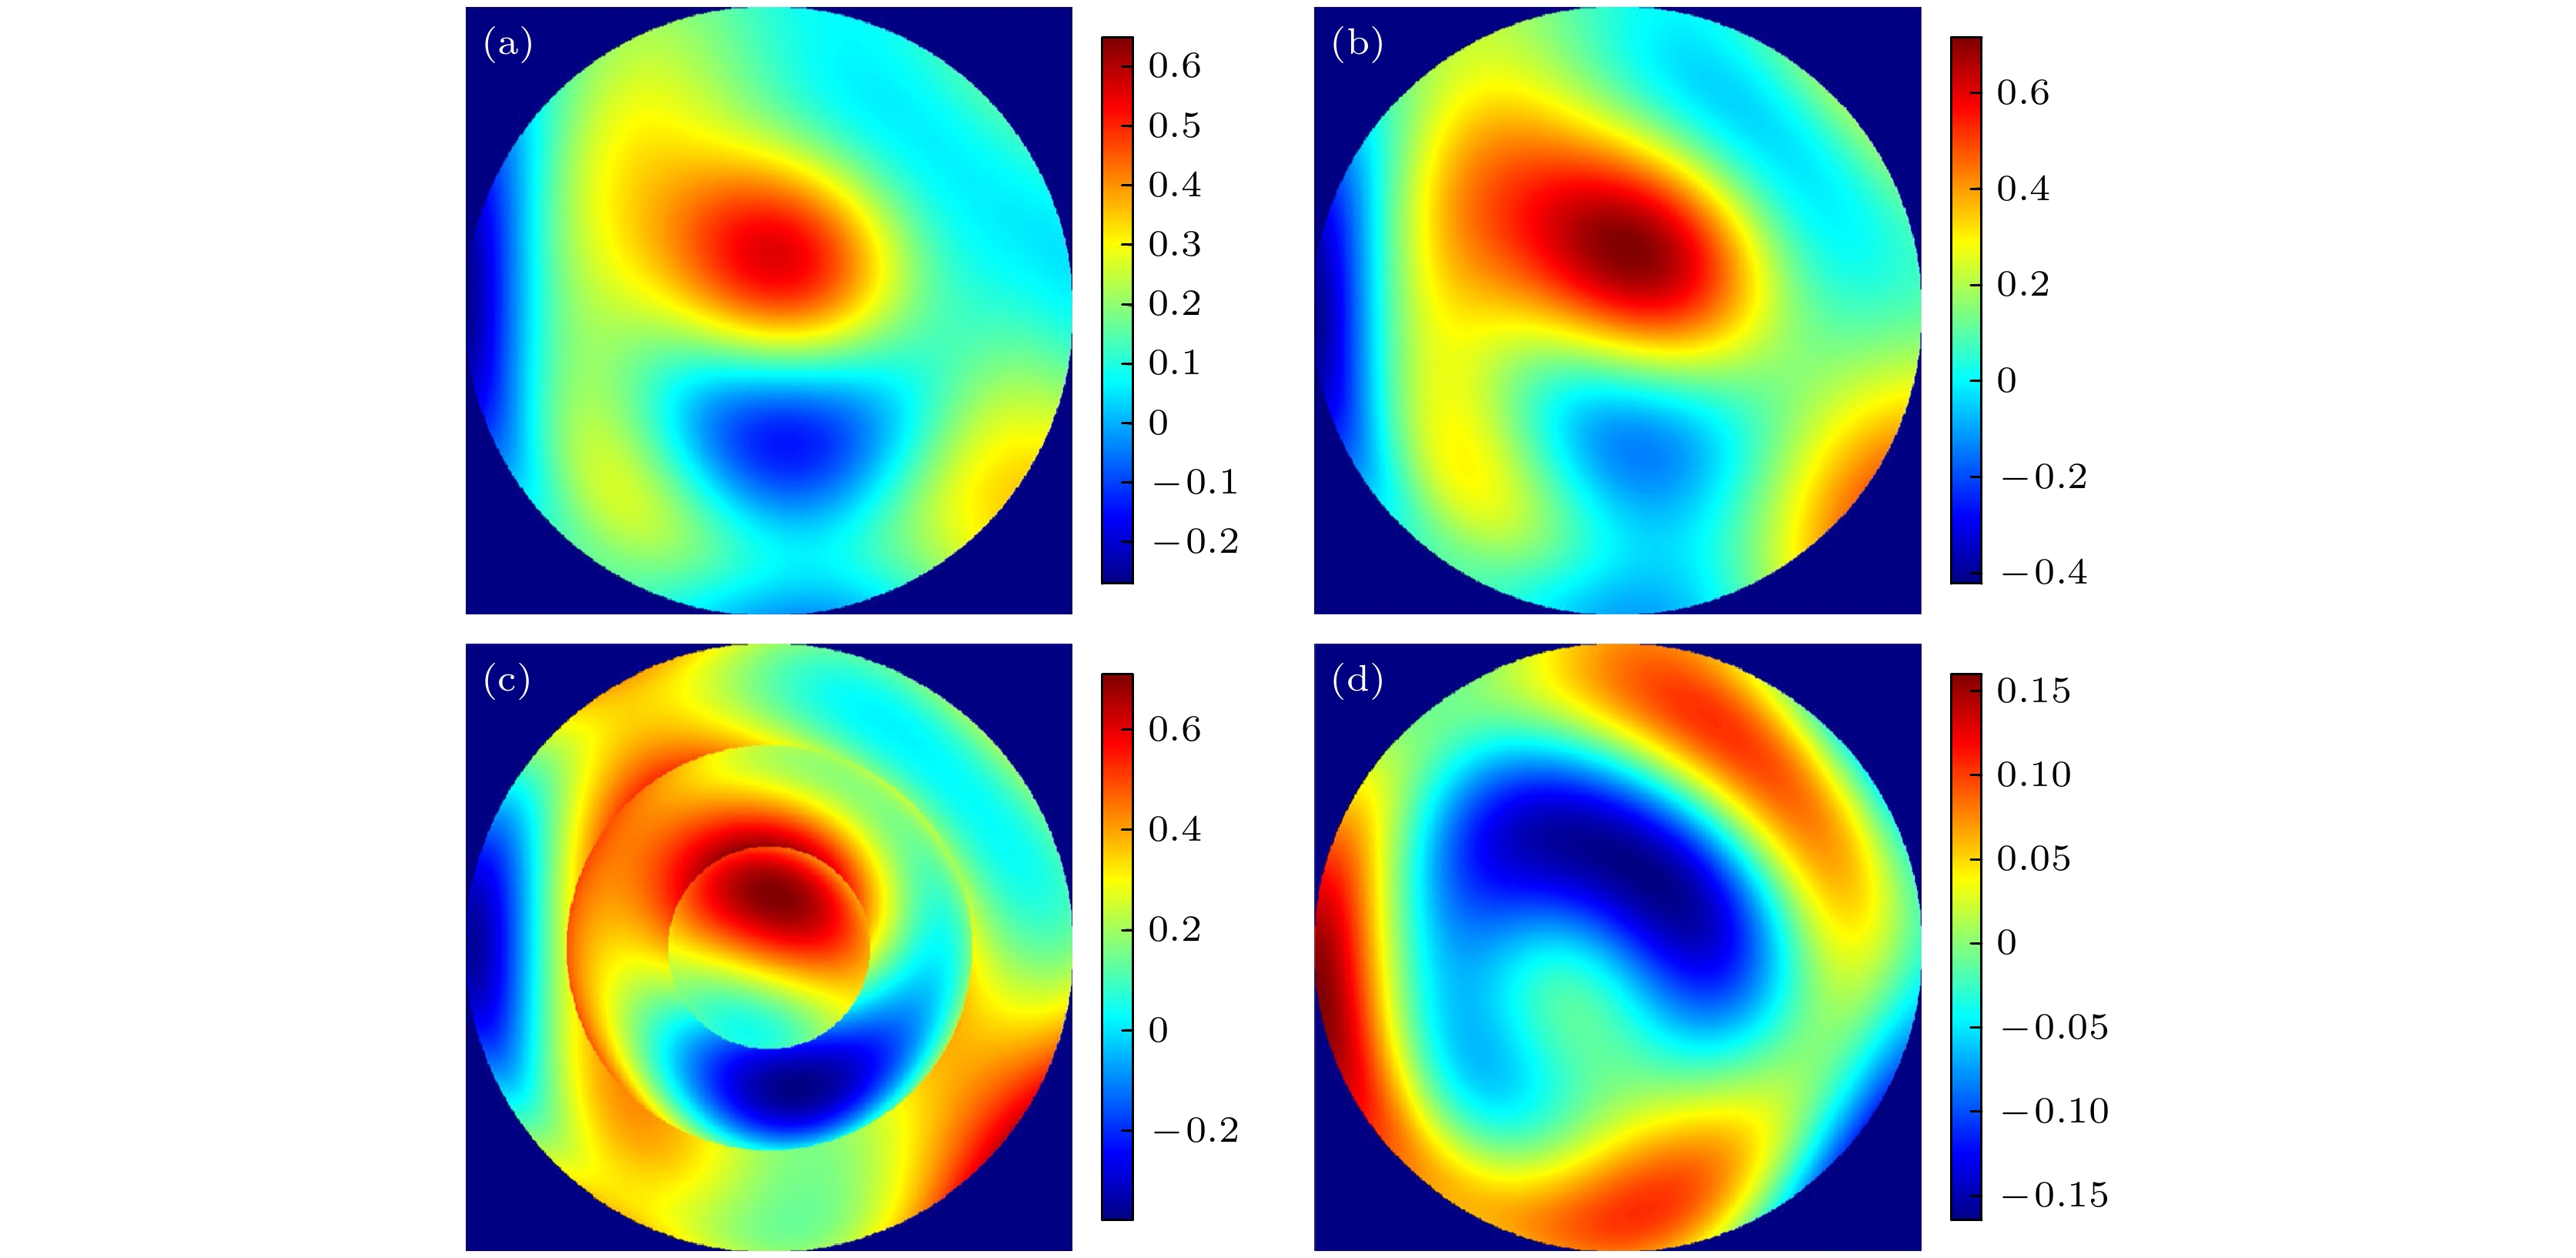
图 4 仿真实验的面形计算结果 (a) 圆形全口径面形计算结果; (b) 圆形全口径面形真值; (c) 圆形全口径面形与各子孔径测量误差的叠加(原始测量值); (d) 圆形全口径面形的计算结果与真值的差值
Fig. 4. Surface calculation results of the simulation experiment: (a) Calculated results of the full-aperture surface; (b) true value of the full-aperture surface; (c) superposition of the full-aperture surface and measurement errors of each subaperture; (d) difference between the calculated result and true value of the full-aperture surface.
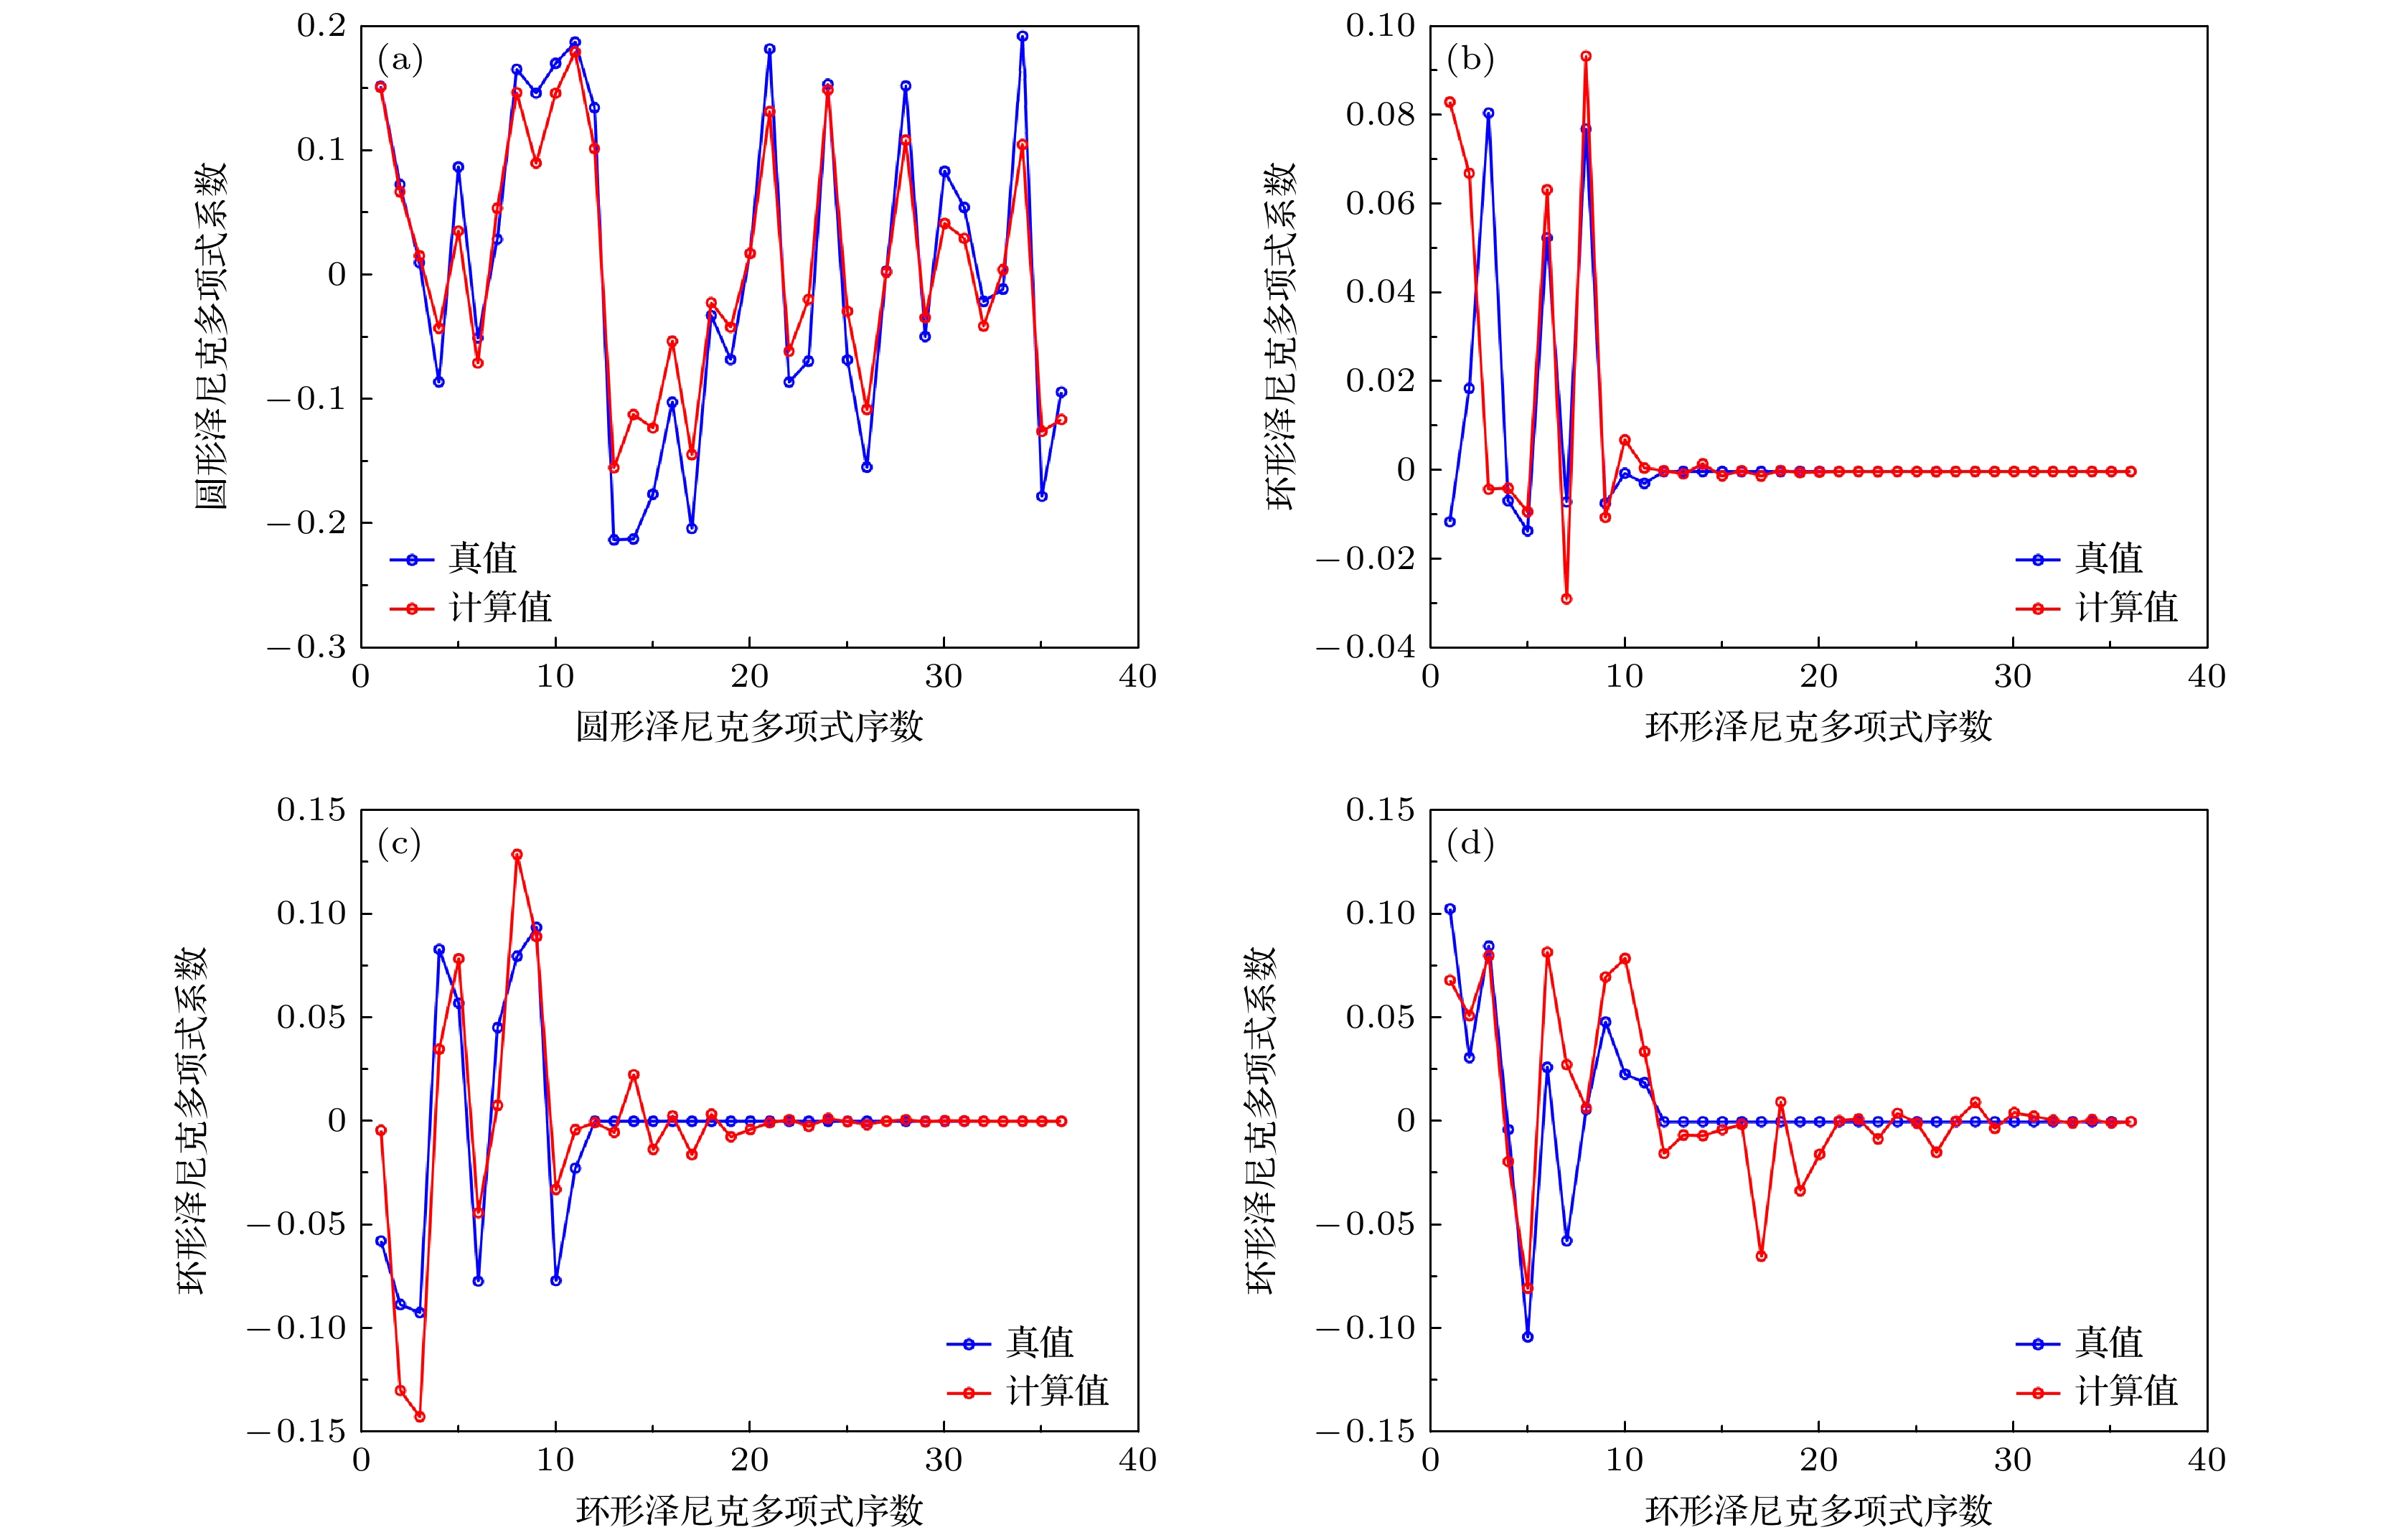
图 5 泽尼克多项式系数的计算值与真值对比 (a) 全口径圆形泽尼克多项式系数; (b) 第1子孔径环形泽尼克多项式系数; (c) 第2子孔径环形泽尼克多项式系数; (d) 第3子孔径环形泽尼克多项式系数
Fig. 5. Comparison between calculated and true values of Zernike polynomial coefficients: (a) Zernike polynomials coefficients of full-aperture; (b) annular Zernike polynomials coefficients of the 1st subaperture; (c) annular Zernike polynomials coefficients of the 2nd subaperture; (d) annular Zernike polynomials coefficients of the 3rd subaperture.
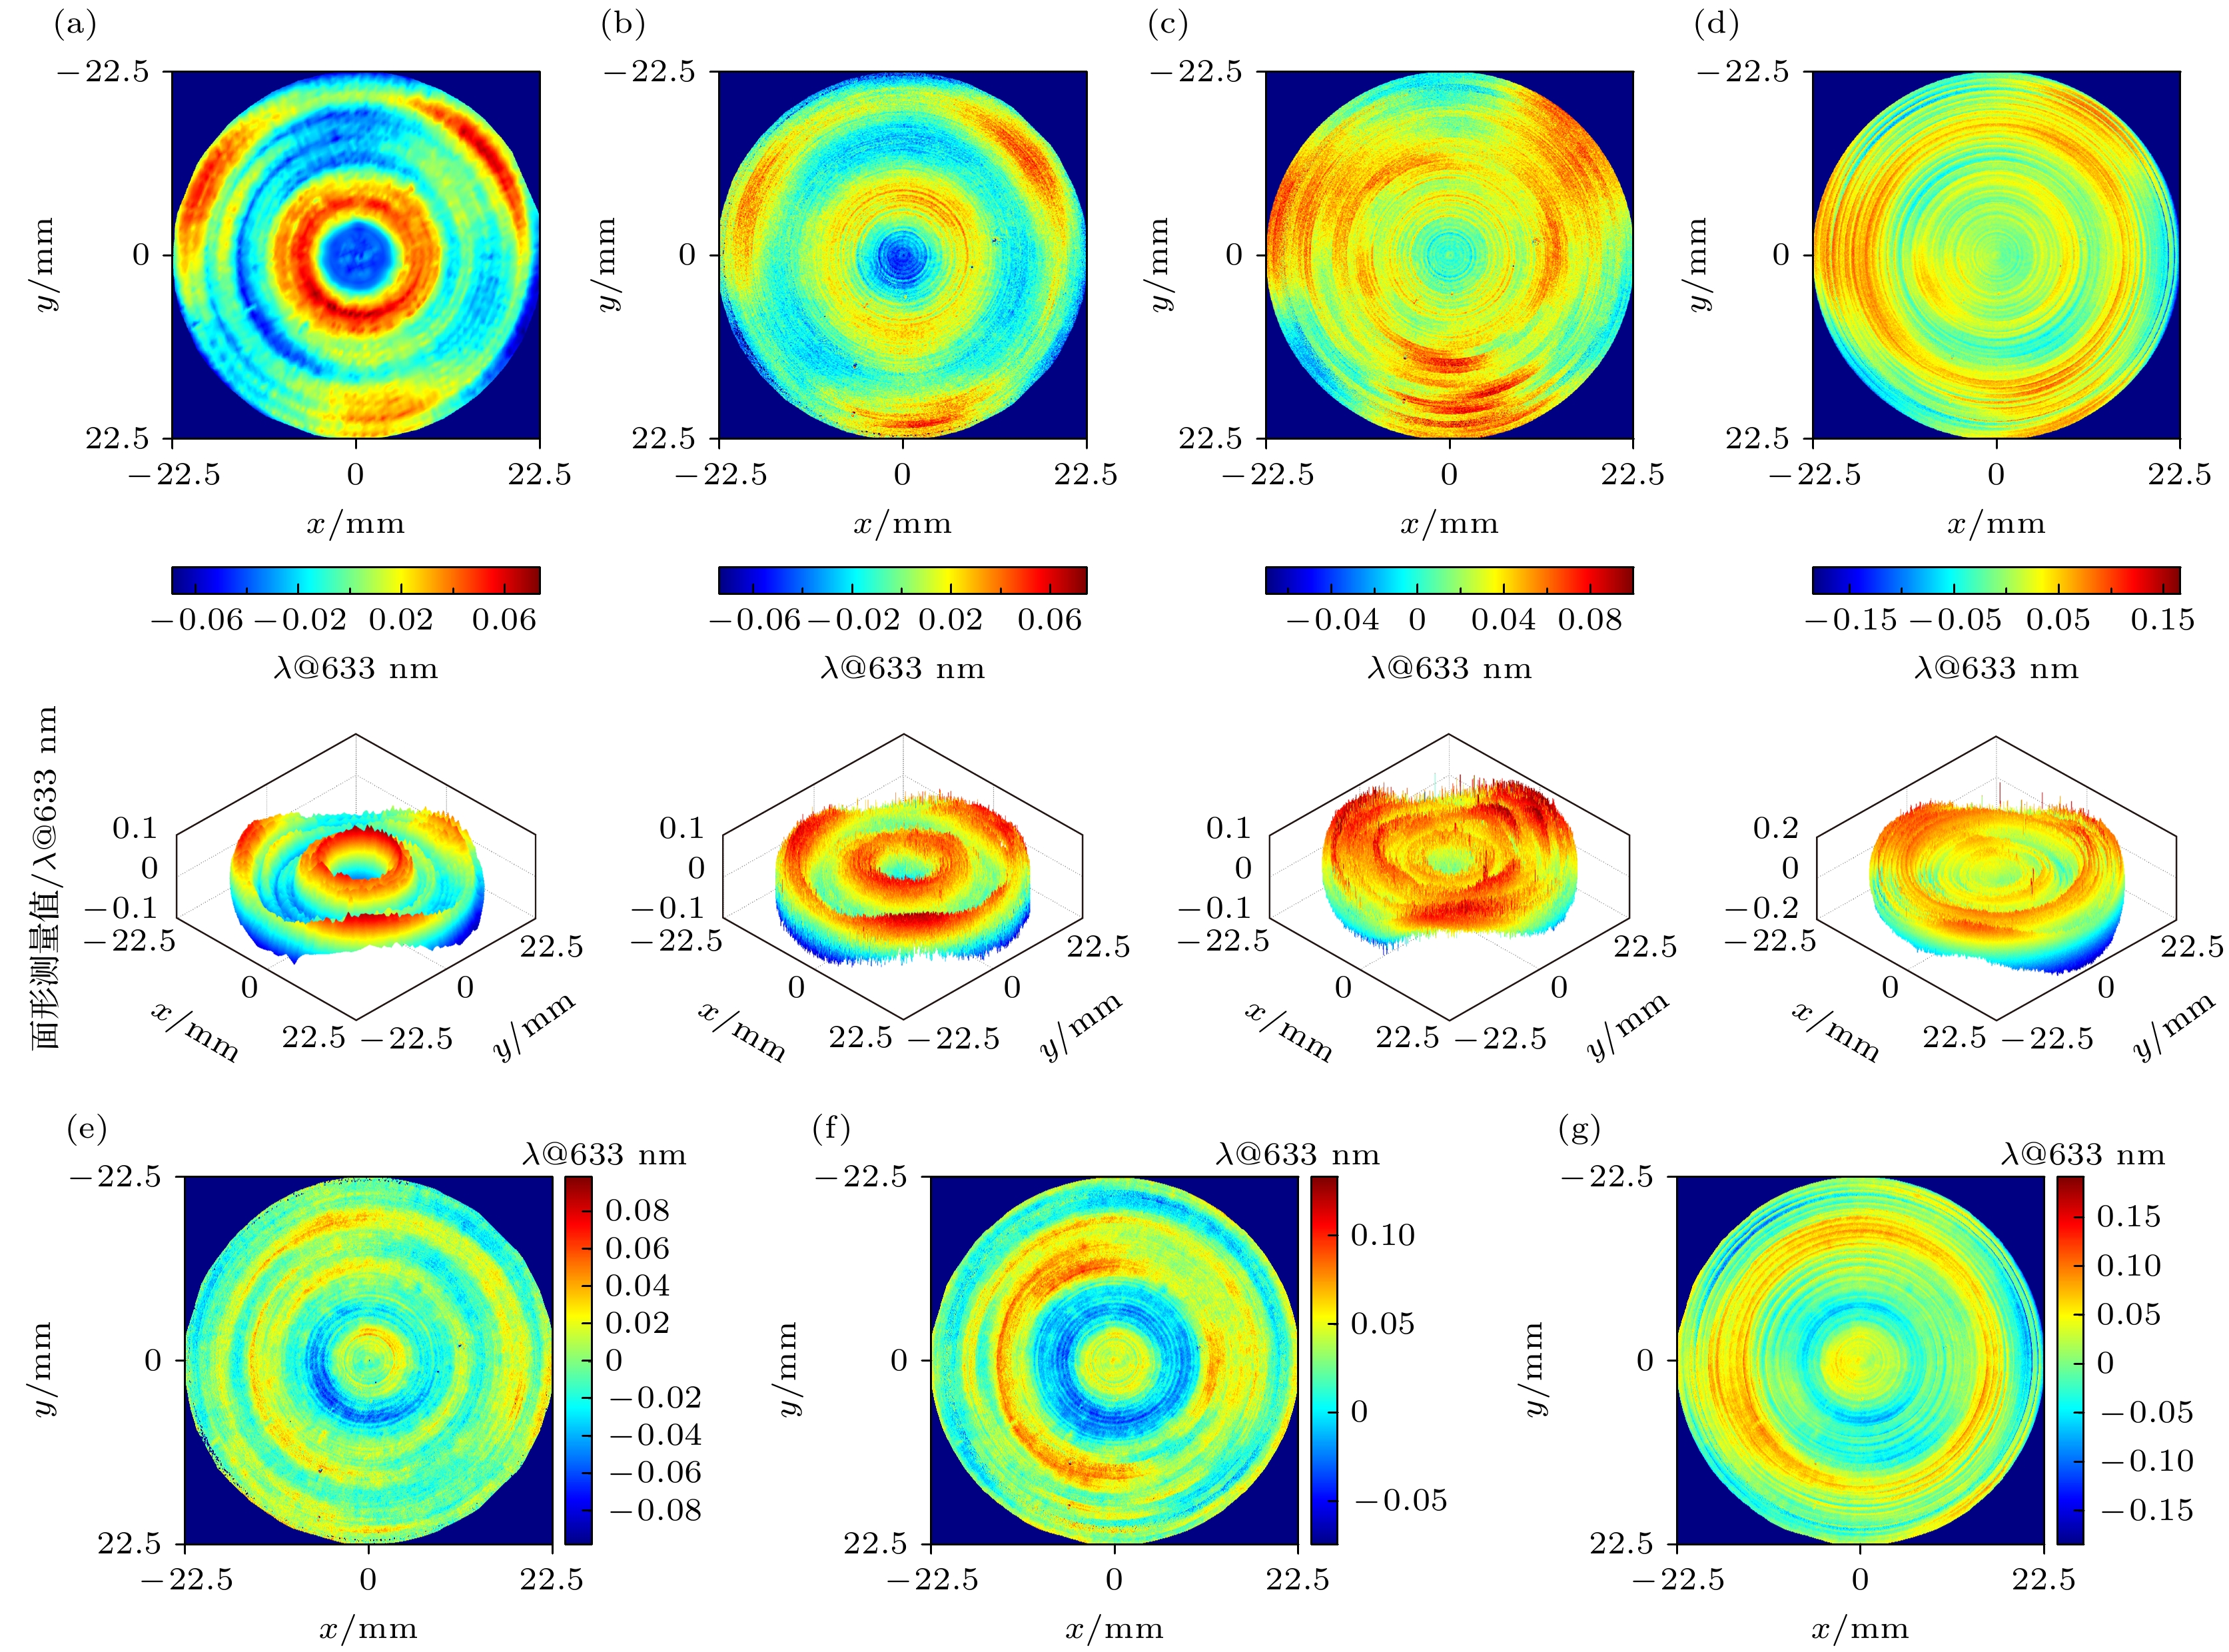
图 8 非球面待测镜面形的参考测量结果以及使用方案1—3得到的拼接测量结果 (a) 参考测量结果; (b) 方案1(本文所提出的方法)的测量结果; (c) 方案2的测量结果; (d) 方案3的测量结果; (e) 图(b)结果与(a)结果的残差面形图; (f) 图(c)结果与图(a)结果的残差面形图; (g) 图(d)结果与图(a)结果的残差面形图
Fig. 8. Reference result of the aspheric surface and measurement results using Method 1–3: (a) Reference results; (b) measurement results of Method 1; (c) measurement results of Method 2; (d) measurement results of Method 3; (e) residual between the results of panel (b) and the results of panel (a); (f) residual between the results of panel (c) and the results of panel (a); (g) residual between the results of panel (d) and the results of panel (a).
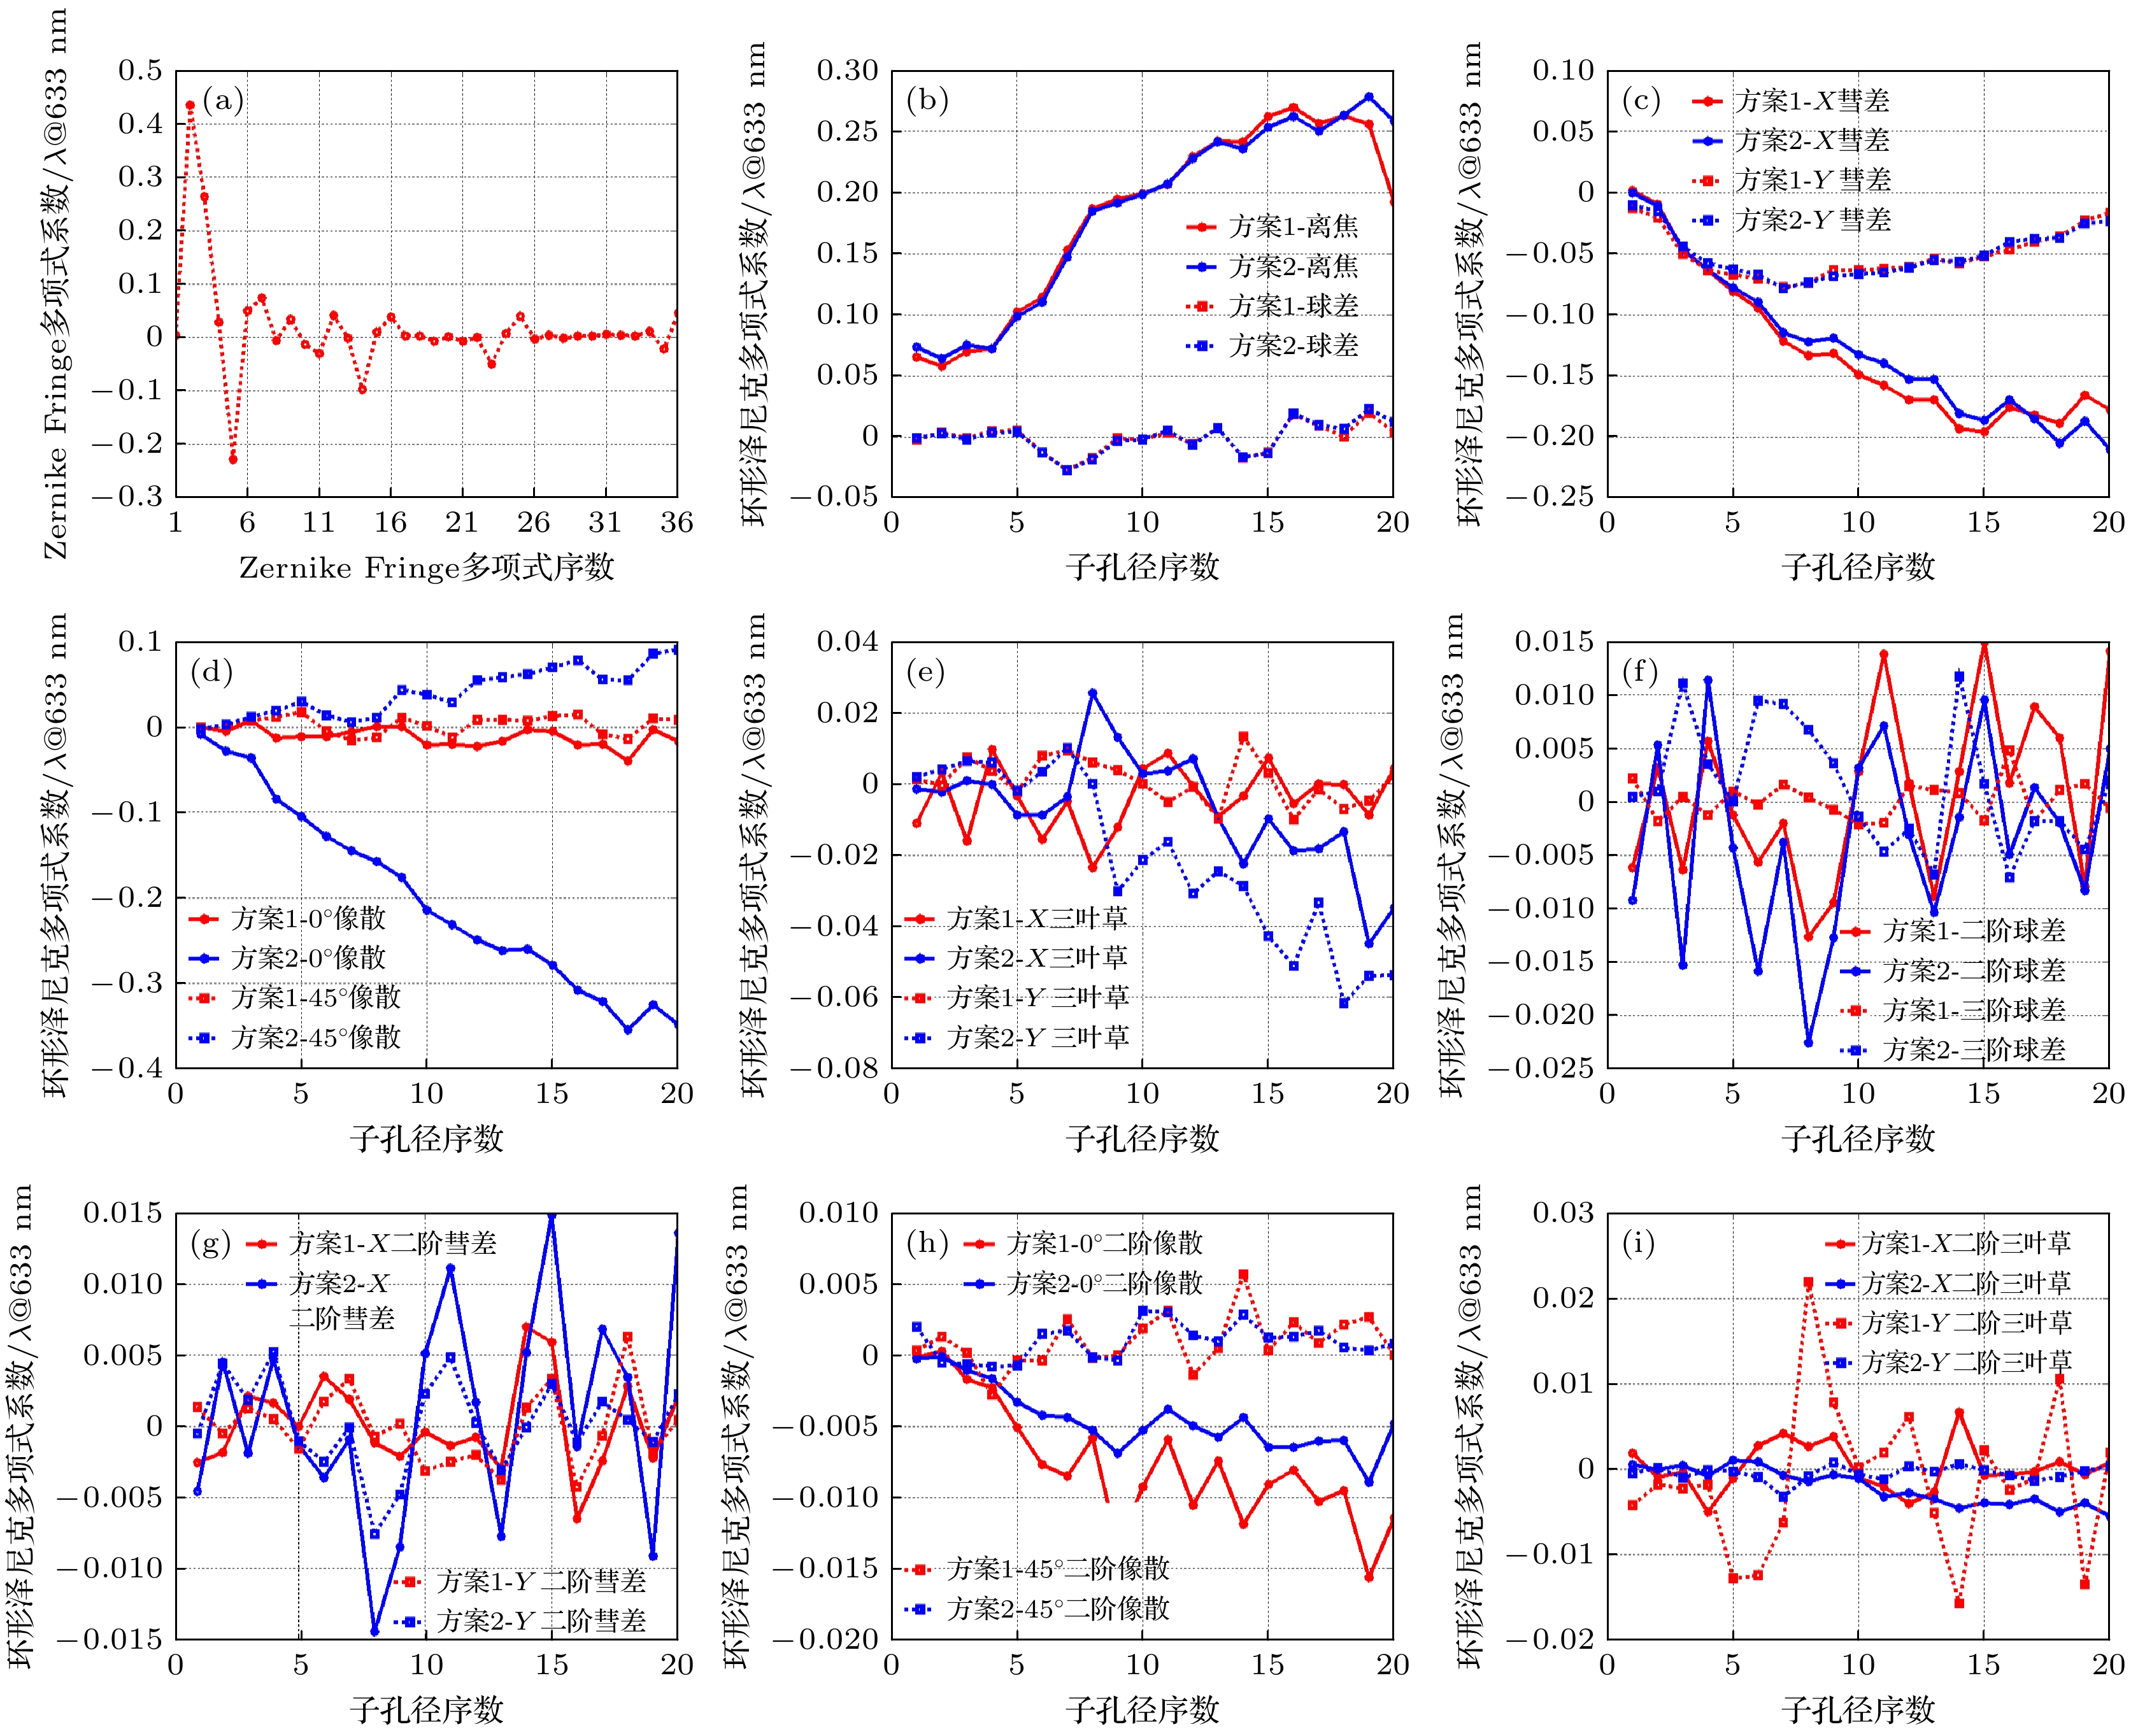
图 12 全口径和各子孔径泽尼克多项式系数曲线 (a) 全口径36项Zernike Fringe多项式系数; (b) 子孔径离焦和球差项系数; (c) 子孔径彗差项系数; (d) 子孔径像散项系数; (e) 子孔径三叶草像差项系数; (f) 子孔径高阶球差项系数; (g) 子孔径二阶彗差项系数; (h) 子孔径二阶像散项系数; (i) 子孔径二阶三叶草像差项系数
Fig. 12. Zernike polynomial coefficient curves for full aperture and subapertures: (a) 36-term Zernike polynomial coefficients in full-aperture; (b) defocus and spherical aberration coefficients in subapertures; (c) coma coefficients in subapertures; (d) astigmatism coefficients in subapertures; (e) trefoil aberration coefficients in subapertures; (f) higher-order spherical aberration coefficients in subapertures; (g) second-order coma coefficients in subapertures; (h) second-order astigmatism coefficients in subapertures; (i) second-order trefoil aberration coefficients in subapertures.
-
[1] 张磊 2016 博士学位论文(杭州: 浙江大学)
Zhang L 2016 Ph. D. Dissertation (Hangzhou: Zhejiang University
[2] Küchel M F 2009 Proc. SPIE 7389 738916
 Google Scholar
[3] 闫力松 2015 博士学位论文(长春: 中国科学院大学(中国科学院长春光学精密机械与物理研究所))
Yan L S 2015 Ph. D. Dissertation (Changchun: China University of Chinese Academy of Sciences (Changchun Institute of Optics and Fine Mechanics and Physics, Chinese Academy of Science)
[4] Kim C J 1982 Appl. Opt. 21 4521
 Google Scholar
[5] 闫力松, 王孝坤, 罗霄, 郑立功, 张学军 2013 红外与激光工程 42 1793
Yan L S, Wang X K, Luo X, Zheng L G, Zhang X J 2013 Infrared Laser Eng. 42 1793
[6] 王宁 2013 硕士学位论文(成都: 中国科学院大学(中国科学院光电技术研究所))
Wang N 2013 M. S. Thesis (Chengdu: China University of Chinese Academy of Sciences (Institute of Optics and Electronics, Chinese Academy of Sciences)
[7] Liu Y M, Lawrence G N, Koliopoulos C L 1988 Appl. Opt. 27 4504
 Google Scholar
[8] Melozzi M, Pezzati L, Mazzoni A 1993 Opt. Eng. 32 5
 Google Scholar
[9] Fleig J, Dumas P, Murphy P E, Forbes G W 2003 Advanced Characterization Techniques for Optics, Semiconductors, and Nanotechnologies San Diego, California, United States, August 3–8, 2003 p296
[10] 王孝坤, 张学军, 王丽辉, 郑立功 2006 光学精密工程 14 527
Wang X K, Zhang X J, Wang L H, Zheng L G 2006 Opt. Precis. Eng. 14 527
[11] 王孝坤, 郑立功 张学军 2010 光学学报 30 2022
 Google Scholar
Wang X K, Zheng L G, Zhang X J 2010 Acta Opt. Sin. 30 2022
 Google Scholar
[12] Chen S Y, Xue S, Wang G L, Tian Y 2017 Opt. Commun. 390 61
 Google Scholar
[13] Hou X, Wu F, Yang L, Wu S B, Chen Q 2006 Appl. Opt. 45 3442
 Google Scholar
[14] Wen Y, Cheng H 2015 Optik 126 2236
 Google Scholar
[15] 郝群, 宁妍, 胡摇 2018 计测技术 38 1
Hao Q, Ning Y, Hu Y 2018 Metrol. Meas. Tech. 38 1
[16] Hou X, Wu F, Yang L, Chen Q 2007 Opt. Express 15 12890
 Google Scholar
[17] Henselmans R 2009 Ph. D. Dissertation (Eindhoven: Technische Universiteit Eindhoven
[18] https://metrology.mahr.com/en-us/news-events/newsroom/item/testing-double-sided-optical-elements-with-the-marsurf-ld-260-aspheric-3d/ [2025-6-30]
[19] https://www.taylor-hobson.com.cn/products/non-contact-3d-optical-profilers/luphos/ [2025-6-30]
[20] https://www.optipro.com/optical-measuring/ultrasurf-5x/ [2025-6-30]
[21] 卢云君, 唐锋, 王向朝, 郭福东 2018 中国激光 45 0404002
 Google Scholar
Lu Y J, Tang F, Wang X Z, Guo F D 2018 Chin. J. Laser. 45 0404002
 Google Scholar
[22] 侯溪, 伍凡, 杨力, 吴时彬, 陈强 2005 光电工程 32 20
Hou X, Wu F, Yang L, Wu S B, Chen Q 2005 Opto-Electron. Eng. 32 20
[23] Beisswanger R, Weckerle M, Pruss C, Reichelt S 2022 Opt. Express 30 25803
 Google Scholar
[24] Gronle A, Pruss C, Herkommer A 2022 Opt. Express 30 797
 Google Scholar
[25] Niu K, Tian C 2022 J. Opt. 24 123001
 Google Scholar
[26] 翟天保 2020 硕士学位论文(上海: 东华大学)
Zhai T B 2020 M. S. Thesis (Shanghai: Donghua University
[27] Mahanjan V N 1981 J. Opt. Soc. Am. A 71 75
 Google Scholar
[28] Hou X, Wu F, Yang L, Chen Q 2006 Appl. Opt. 45 8893
 Google Scholar
[29] 樊孝贺 2019 博士学位论文(长春: 中国科学院大学(中国科学院长春光学精密机械与物理研究所))
Fan X H 2019 Ph. D. Dissertation (Changchun: China University of Chinese Academy of Sciences (Changchun Institute of Optics, Fine Mechanics and Physics, Chinese Academy of Sciences)
[30] 朱黎明 2009 硕士学位论文(哈尔滨: 哈尔滨工业大学)
Zhu L M 2009 M. S. Thesis (Harbin: Harbin Institute of Technology
[31] 乔玉晶, 谭久彬, 王伟波 2008 光电子·激光 19 1497
Qiao Y J, Tan J B, Wang W B 2008 J. Optoelectron. Laser 19 1497
[32] Xue D, Zheng L, Zhang X 2005 Optical Design and Testing II Beijing, China, November 8–11, 2004 p752
[33] Robbins H, Monro S 1951 Ann. Math. Stat. 22 400
 Google Scholar
[34] Bertsekas D P, Tsitsiklis J N 2000 SIAM J. Optim. 10 627
 Google Scholar
[35] Forbes G W 2007 Opt. Express 15 5218
 Google Scholar
[36] 王秀娟 2023 硕士学位论文(合肥: 合肥工业大学)
Wang X J 2023 M. S. Thesis (Hefei: Hefei University of Technology
[37] 何丽, 武中华, 康燕, 苏志德 2016 激光与光电子学进展 53 122201
 Google Scholar
He L, Wu Z H, Kang Y, Su Z D 2016 Laser Optoelectron. Prog. 53 122201
 Google Scholar
[38] Evans C J 2009 Opt. Eng. 48 043605
 Google Scholar
计量
- 文章访问数: 1400
- PDF下载量: 26
- 被引次数: 0


 下载:
下载:
